Showing posts with label guide. Show all posts

SSDT Editing Guide and Subforum


A few days ago, we released a new MultiBeast featuring SSDT files for Sandy Bridge CPUs. To assist with further SSDT editing and customizing, MacMan has written a guide at his blog called Customizing SSDT: Power Management Optimization on 10.7.4. The guide documents what you need to know about the SSDT so you can optimize your Socket 1155 CPU for an overclock greater then the 4.2 GHz supported in MultiBeast.

Good luck! And share your custom SSDTs and results at the new SSDT subforum.

For discussions on this and other topics, register today at tonymacx86.com!

Update Your Mac OS X Lion App to 10.7.3 [QuickTip]

The original installation media for Mac OS X Snow Leopard was a 10.6 DVD. The DVD was only updated once to version 10.6.3. In order to provide more frequent updates to users, Apple is now slipstreaming the latest version of Lion directly into the download. Upon fresh installation, no updating is necessary!

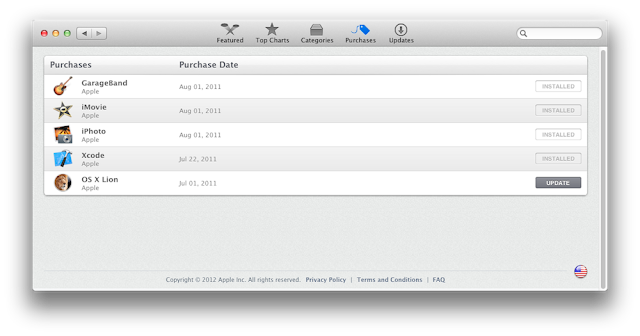
If you purchased Lion from the App Store prior to February 1st, 2012, you most likely have 10.7.2. To re-download Lion and update your App to 10.7.3, simply log into the Mac App Store and click Update.
When the download finishes, the app will automatically open. The updated 10.7.3 Install Mac OS X Lion App can be found in the Applications folder.

If you don't see the Update button, follow this simple procedure.

     1. Delete your existing copy of Install Mac OS X Lion.app from Applications folder.
     2. Hold down the alt/option key on your keyboard, and click the App Store icon.
     3. With alt/option key held, click on Purchased
     4. With alt/option key held, click on OS X Lion
     5. With alt/option key held, click on Install

If neither of the above processes work for you, try creating a new User account. You can delete it later.

     1. Open System Preferences
     2. Click on Accounts
     3. Click Lock Icon
     4. Click (+) to add a new User
     5. Create a new Admin User
     6. Log out, and log into new User
     7. Proceed with steps above.

Related Posts:
For discussions on this and other topics, register today at tonymacx86.com!

Hackintosh Basics: Kernel Panics & Boot Flags


Our friend StingRay has been hard at work illustrating the basics of Hackintoshing through a series of helpful learning videos. These next two focus on troubleshooting your system. The first explains some of the causes and solutions to certain system crashes, or kernel panics. The other is an introduction to the uses of bootloader flags. Produced and narrated by StingRay. 
For discussions on this and other topics, register today at tonymacx86.com!

UniBeast: Install Mac OS X Lion Using an All-In-One Bootable USB Drive

Introducing UniBeast- our new tool to create a bootable USB drive from your Mac App Store purchased copy of Install Mac OS X Lion or Apple Store purchased Mac OS X Lion USB Thumb Drive. This all-in-one bootable USB drive can also be used as a rescue boot drive for system recovery.

UniBeast + MultiBeast is the easiest method to do a clean install of Mac OS X Lion or update any Snow Leopard system. The following guide requires no coding, terminal work, or Mac experience of any kind. 

You Will Need


8GB or larger USB Drive

Install Mac OS X Lion Application
OR
Mac OS X Lion USB Thumb Drive
STEP 1: Purchase Mac OS X Lion 
The operating system is not free. There are two ways to purchase your copy of Mac OS X Lion. The simplest way is to download the Application from the Mac App Store. Alternately, the OS X Lion USB Thumb is available online at Apple.com or any Apple Store retail location. 

STEP 2: Create a Bootable USB Drive Using UniBeast
Take a deep breath and take your time- this is pretty simple, but it's easy to miss things if you rush. Follow each step to the letter.

     1. Insert USB drive
     2. Open /Applications/Utilities/Disk Utility
     3. Highlight USB drive in left column
     4. Click Partition tab
     5. Click Current and choose 1 Partition

     6. Click Options...
     7. Choose Master Boot Record
     8. Under Name: type USB (You can rename it later)
     9. Under Format: choose Mac OS Extended (Journaled)
     10. Click Apply then Partition
     11. If using the Install Mac OS X Lion Application, it must be in /Applications folder.
     12. If using the Mac OS X Lion USB Thumb Drive, make sure it's plugged in and mounted.
     13. Download and run UniBeast
     14. Click Continue, ContinueContinue, Agree
     15. At Destination Select, choose USB and click Continue
     16. If using the Mac App Store "Install Mac OS X Lion" App choose that option.
     17. If using the Apple Store "OS X Lion USB Thumb Drive" choose that option.
     18. If using a laptop, choose Laptop Support in addition to one of the above options.
     19. Click Continue
     20. Enter password and click Install

The process will take about 10-15 minutes, depending on system and drive speed, but will show hours. Do not unplug or stop during this time.

STEP 3: Install Mac OS X Lion
You're almost done! All you need to do is boot from the USB drive and install! Your hard drive should be set in BIOS to AHCI mode. For recommended BIOS settings and screenshots, check out iBoot + MultiBeast.

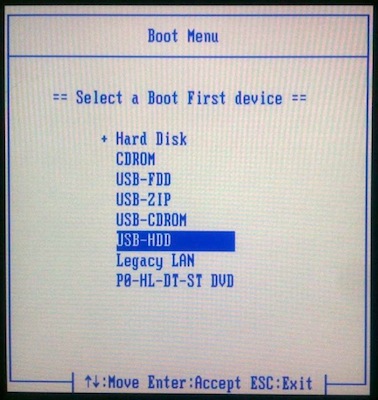
     1. If you have a Gigabyte motherboard press F12 to choose boot device.


     2. Choose USB-HDD
     3. At Chimera Boot Screen, choose USB

You may have to type extra command line flags to reach the installer. 
  • Asus Motherboard + NVIDIA Graphics - type PCIRootUID=0
  • Unsupported graphics - type GraphicsEnabler=No
  • Boot in Single-user mode - type -s
  • Boot in Verbose mode - type -v
  • Boot in Safe mode - type -x

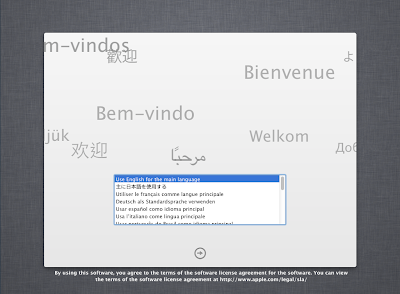
     4. When you arrive at the Installer, choose language.

If updating an existing Snow Leopard install, skip 5-14.

     5. In the top menubar choose Utilities, and open Disk Utility
     6. Highlight your target hard drive for the Lion installation in left column. 
     7. Click Partition tab
     8. Click Current and choose 1 Partition
     9. Click Options...
     10. Choose GUID Partition Method
     11. Under Name: type Lion  (You can rename it later)
     12. Under Format: choose Mac OS Extended (Journaled)
     13. Click Apply then Partition
     14. Close Disk Utility
     15. When the installer asks you where to install, choose Lion, or your existing install.
     16. Upon completion, restart system

The installation is complete, but the drive isn't bootable yet. Boot from the USB again, this time choosing Lion.

     17. If you have a Gigabyte motherboard, press F12 to choose boot device.
     18. Choose USB-HDD
     19. At Chimera Boot Screen, choose your new Lion installation.


STEP 4: Post-Installation Using MultiBeast
MultiBeast is an all-in-one post-installation tool designed to enable boot from hard drive, and install support for Audio, Network, and Graphics. In addition it includes System Utilities to repair permissions and a collection of drivers, bootloaders, config files and handy software.

     1. Complete Mac OS X Lion setup.
     2. When you arrive at desktop, open Safari
Note, if Safari crashes, disable Web Content: Browser Plug-Ins under Preferences>Security.
     3. Browse to tonymacx86.com and log in. If you don't have a user account, create one!
     4. Go to tonymacx86.com/downloads to download the latest MultiBeast
     5. Go to the DSDT Database to download your motherboard's DSDT
     6. Open Downloads folder and move the .aml file to the Desktop
     7. Open and run Multibeast's UserDSDT
     8. Restart system

If your drive doesn't boot on its own, and you get an error referencing boot0, fix it using the methods listed here.
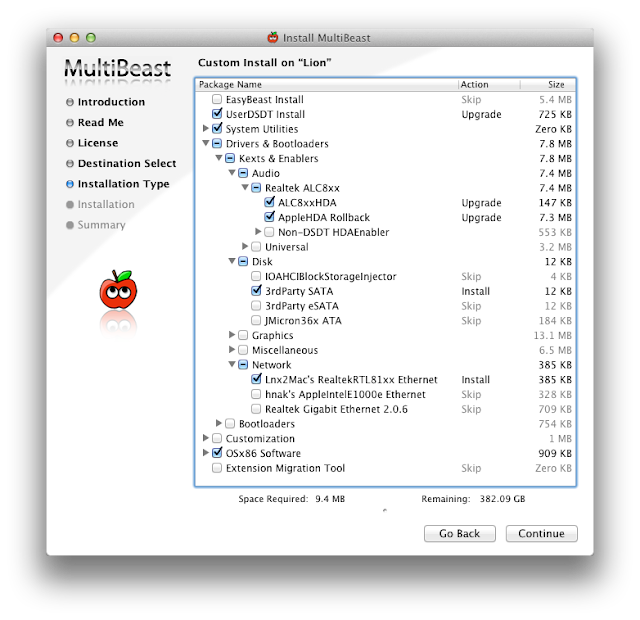

The above photo will provide general post-installation support for any recommended CustoMac build

You may also use MultiBeast to install further drivers to enable ethernet, sound, graphics, etc... Be sure to read the documentation provided in MultiBeast Features.pdf about each option. Both UserDSDT and EasyBeast install the proper bootloader by default, so you'll not need to check that option.

Congratulations!


You now have a fully updated bootable version of Mac OS X Lion on your CustoMac! And a handy USB rescue drive to boot from in case things go pear-shaped. It's easy to get frustrated, but don't give up! If you get stuck, there are many users with similar hardware in the tonymacx86 Forum to provide support. Special thanks to everyone in the community, and our Mods for testing!

If you've had success using this guide, consider a contribution to help keep the sites going. We're constantly updating and tweaking our tools to help you.

Good luck and have fun!

-tonymacx86 & MacMan

Related Posts: 

For discussions on this and other topics, register today at tonymacx86.com!

Update Your Retail Mac OS X Lion App to 10.7.2 [QuickTip]

The original installation media for Mac OS X Snow Leopard was a 10.6 DVD. The DVD was only updated once to version 10.6.3. In order to provide more frequent updates to users, Apple is now slipstreaming the latest version of Lion directly into the download. Upon fresh installation, no updating is necessary!

If you purchased Lion from the App Store prior to October 12, 2011, you have either 10.7.0 or 10.7.1. To re-download and update your App to 10.7.2, follow this simple procedure.

     1. Delete your existing copy of Install Mac OS X Lion.app from Applications folder.
     2. Hold down the alt/option key on your keyboard, and click the App Store icon.
     3. With alt/option key held, click on Purchased
     4. With alt/option key held, click on OS X Lion
     5. With alt/option key held, click on Install

The Installed button should change to Install, allowing you to re-download Lion. When the download finishes, the app will automatically open. The updated 10.7.2 Install Mac OS X Lion App can be found in the Applications folder.


If this doesn't work for you, try creating a new User account. You can delete it later.

     1. Open System Preferences
     2. Click on Accounts
     3. Click Lock Icon
     4. Click (+) to add a new User
     5. Create a new Admin User
     6. Log out, and log into new User
     7. Proceed with steps above.
For discussions on this and other topics, register today at tonymacx86.com!

Demystifying HDMI Audio in Mac OS X 10.7 Lion


HDMI Audio + Video can be enabled on Mac OS X Lion for most graphics card and motherboard configurations without much hassle using the replacement audio driver VoodooHDA. Using the supplied AppleHDA.kext for HDMI audio is something of a challenge, but provides numerous benefits including native Mac OS X support, high quality digital surround audio and overall system integration.

Since Lion's launch, tonymacx86.com mod toleda has been exploring and experimenting using different methods, and has come up with what we think is a pretty definitive series of guides on the subject. Please note that this is an advanced process and is highly dependent on your exact hardware configuration.

Enabling HDMI audio in Mac OS X 10.7.x is comprised of three parts and six guides:

Part 1: HDMI Audio Requirements 
Determines if your system is capable of HDMI audio.

Part 2: HDMI Audio DSDT Edits
Configures your motherboard for HDMI audio.
     2a. Discrete Graphics - AMD/Nvidia
     2b. Integrated Graphics - Intel HD 3000

Part 3: HDMI Audio Kext Edits
Customizes Mac OS X for your graphics card.
     3a. AMD HD 5xxx and HD 6xxx
     3b. Nvidia GT/S/X 4xx and GT/S/X 5xx
     3c. Intel HD3000 Integrated Graphics


Check out the HDMI Audio subforum set up to host toleda's guides and general troubleshooting topics. Good luck, and let us know how it works for you!

-tonymacx86, toleda & MacMan
For discussions on this and other topics, register today at tonymacx86.com!

xMove 1.1 Update: Installation With the Retail OS X Lion USB Thumb Drive


Since the 10.7 Lion USB Thumb Drive became available, we've been inundated with requests for a method of using it for direct Lion installation. To this end, we've made a special new version of xMove. xMove now has 2 options- one for the traditional App Store method, and a new option that allows the USB Thumb Drive to be used to create the Installer partition.

xMove Guide for USB Thumb Drive 

      1. Boot into existing Snow Leopard installation
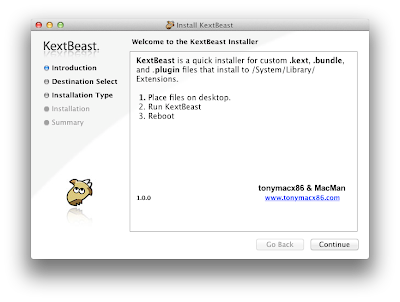
      2. Insert USB Thumb Drive
      3. Run xMove - targeting blank partition or drive
      4. Reboot and choose Installer
      5. Install Lion
Unfortunately, it is proving exceedingly difficult to boot the USB Thumb Drive directly. Because of the layout changes of the media in comparison to Snow Leopard, it's a multi-stage installation process necessitating changes to the bootloader. We are still actively testing and working on a method that will not require access to Snow Leopard 10.6 to install Lion, but there is no ETA for this as of yet. Until then, we recommend xMove + MultiBeast for retail installation.

Thanks for hanging in there and good luck!

-tonymacx86 & MacMan

Related Posts: 
For discussions on this and other topics, register today at tonymacx86.com!

Building a Sandy Bridge CustoMac: CustoMac Mini 2011

We're super excited about the new support for onboard Intel HD 3000 graphics in Lion introduced in Chimera 1.5! This means is that it's now possible to build a smoking fast Mini-ITX rig without the need for a power hungry, and expensive graphics card! It even has working HDMI Audio!

The CustoMac Mini 2011 prospective build is fully compatible with both the iBoot and xMove methods and has a pre-edited DSDT available in our DSDT Database for full optimization. 
    We've included all components besides monitor, keyboard and mouse, as any standard ones will do. You can use these recommendations as a jumping off point for further customization, or as a shopping list. Prices reflect lowest totals available on Amazon as of September 2011, and do not include shipping, tax, or rebates.

    CustoMac Mini 2011
    $322.60
       
    CPU: Intel Core i3-2105 with Intel HD 3000 Graphics - Amazon  Newegg 
    Motherboard: Gigabyte GA-H67N-USB3-B3 - Amazon  Newegg
    RAM: CORSAIR 8GB (2 x 4GB) 240-Pin DDR3 - Amazon  Newegg 
    Case + Power Supply Unit: APEX MI-008 Mini-ITX with 250w PSU - Amazon  Newegg

    Other Components: 
    Optical Drive: Sony Optiarc - Amazon  Newegg  $19.99
    Solid State Drive: Corsair Force Series 3 120GB SATA 6Gb/s - Amazon  Newegg $195.39
    Hard Drive: Seagate Barracuda 1 TB SATA 6Gb/s - Amazon  Newegg $59.58
    Operating System (10.6): Mac OS X Snow Leopard $29.00
    Operating System Upgrade (10.7): Mac OS X Lion $29.99

    Optional Accessories


    Remember, when building your own rig, it's easy to get frustrated- don't give up! There are users with similar specs in the tonymacx86 Forum to help you out if you get stuck. 


    Oh, and don't forget, if you end up buying anything, click through one of the links above or in the sidebar. That way, you'll be supporting the site, as well as getting the best prices. Thanks in advance! 

    Good luck, and let us know how it goes!

    HDMI Audio Solutions: Intel HD 3000 Graphics


    We've recently figured out how to enable HDMI Audio on the Sandy Bridge Intel HD 3000 onboard graphics controller! This is a rather advanced procedure, and requires editing both your DSDT and the audio kexts. If you have a GA-H67N-USB3-B3 and want to test, or aren't up for the challenge, we've included pre-edited files at the end of this article.

    Requirements:
    • Mac OS X 10.7.x Lion
    • Gigabyte Socket 1155 H61, H67, or Z68 Motherboard 
    • Intel Core i3/i5/i7 CPU featuring HD 3000 onboard graphics
      • Current Desktop Models: i3-2105, i3-2125, i5-2405S, i5-2500K, i7-2600K
    • Chimera v1.5 or later - available in MultiBeast 4.0: Lion Edition
    • Mac mini 5,1 system definition - available in MultiBeast 4.0: Lion Edition
    • AppleHDA.kext 2.1.1 or later (10.7.1)
      • If you've used AppleHDA Rollback, get a new 2.1.1 here
    • Plist Editor - like Plist Edit Pro 
    • Hex Editor - like Hex Fiend
    • DSDT Editor - like DSDTSE
    • Kext Installer - like KextBeast
    NOTE: Most Gigabyte H61/H67/Z68 motherboards have Realtek ALC 889, so this guide will use that codec in the examples.

    STEP 1: Edit AppleHDAHardwareConfigDriver.kext 
    The first step is to add your onboard audio information to the AppleHDA hardware configuration plugin.

         1. Copy your unedited AppleHDA.kext to Desktop. Make sure it's v2.1.1 or later.
         2, Right-click AppleHDA.kext and choose Show Package Contents
         3. Open Contents/PlugIns/AppleHDAHardwareConfigDriver.kext/Contents/Info.plist
         4, Look for IOKitPersonalities > HDA Hardware Config Resource > HDAConfigDefault
         5. Remove all configurations (1-17) except 0
         6. Edit configuration 0 to match the following:
    • CodecID: 283,904,137
    • ConfigData: 21471C10 21471D40 21471E11 21471F01 21571C20 21571D10 21571E01 21571F01 21671C30 21671D60 21671E01 21671F01 21771C80 21771D20 21771E01 21771F01 21871C40 21871D90 21871EA1 21871F90 21971C50 21971D90 21971EA1 21971F02 21A71C60 21A71D30 21A71E81 21A71F01 21B71C70 21B71D40 21B71E21 21B71F02 21E71C90 21E71D61 21E71E4B 21E71F01 21F71CA0 21F71D71 21F71ECB 21F71F01
    • FuncGroup: 3
    • LayoutID: 889
    STEP 2: Add Layout889.xml to AppleHDA.kext
    The next step is to add codec-specific layout information to AppleHDA.

         1. Navigate to AppleHDA.kext/Contents/Resources/layout12.xml
         2. Right click layout12.xml, choose Duplicate
         3. Rename layout12 copy.xml to layout889.xml
         4. Open layout889.xml with Plist Edit Pro
         5. Edit the top 2 sections to match the following:
    • LayoutID: 889
    • CodecID: 283,904,137
         6. Save and copy layout889.xml to AppleHDA.kext/Contents/Resources
    STEP 3: Binary Patch AppleHDA.kext (Optional)
    If you plan to use onboard audio in addition to HDMI audio, you must patch the AppleHDA binary. If not, skip this step.

         1. Open AppleHDA.kext/Contents/MacOS/AppleHDA binary file using Hex Fiend
         2. Type command-F to initiate Find and Replace menu
         3. Enter 85 08 EC 10 in Find field,
         4. Enter 89 08 EC 10 in Replace field.
         5. Click Replace All
         6. Save file.
    STEP 4: Install AppleHDA.kext
         1. Place patched AppleHDA.kext on Desktop
         2. Run KextBeast
      STEP 5: DSDT Edits
      In order for the system to recognize that you want audio from the HDMI port, you have to edit your DSDT. This next step assumes you have already installed a pre-edited DSDT from our DSDT Database.

           1. Open your /Extra/DSDT.aml with DSDTSE
           2. Search for HDEF
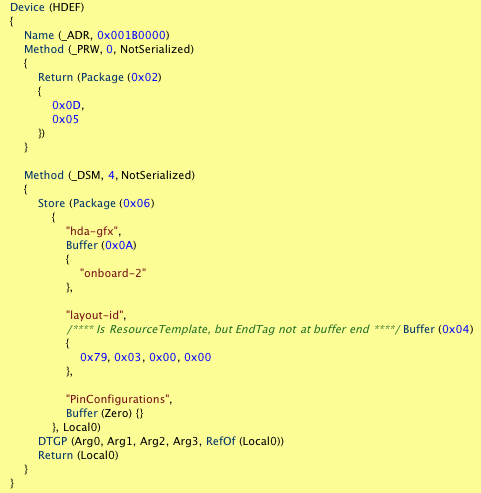
           3. Add "hda-gfx" "onboard-2" code snippet to Device (HDEF) section as shown.


           4. Search for IGD0
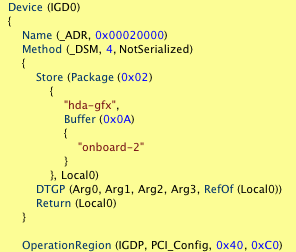
           5. Add "hda-gfx" "onboard-2" code snippet to Device (IGD0) section as shown.


           6. Save and Compile
           7. Replace your /Extra/DSDT.aml with the new one.
        STEP 6: Compare Your Work (Optional)
        Download and compare your files vs. these verified versons. 
        STEP 6: Reboot
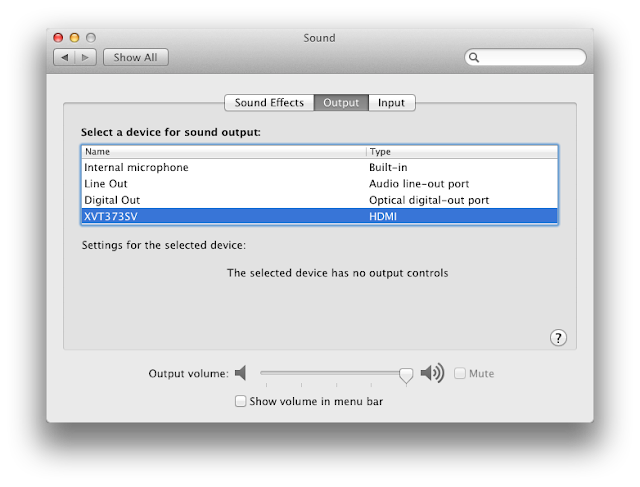
        Reboot system with the HDMI cable plugged at boot. Use the 2nd HDMI slot on the GA-H67N-USB3-B3. Congratulations! You're done!
        We'll be re-posting a series of guides updated for 10.7 Lion in the HDMI Audio section of the forum in the next week or so. These will show how to enable HDMI Audio on most compatible AMD and NVIDIA graphics cards. Special thanks to toleda for all the testing and research!

        Good luck!

        -tonymacx86 & MacMan

        Related Posts:
        Demystifying Mac OS X HDMI Audio
        HDMI Audio + Video Solutions
        For discussions on this and other topics, register today at tonymacx86.com!