Showing posts with label DSDT. Show all posts

DSDT Database Update: Gigabyte X58 Motherboards

We've done another round of DSDT Database updates, this time for Gigabyte X58 motherboards. The following DSDTs have been extracted from BIOS, edited using the using minimal edits, and added to the DSDT Database.
  • Gigabyte GA-EX58-UD3R-1.6 FK (for 1.6 or 1.7)
  • Gigabyte GA-EX58-UD5 F13 
  • Gigabyte GA-G1.Assassin F3 
  • Gigabyte GA-X58A-UD3R-2.0 FH
  • Gigabyte GA-X58A-UD9 F6 
NOTE: All DSDTs are verified extracts from the latest BIOS versions.

To use on an existing system, download and replace your /Extra/DSDT.aml. For a fresh install, instructions on MultiBeast's UserDSDT are available here. Be sure to only use the matching DSDT for your motherboard and BIOS version. 

-tonymacx86 & MacMan

DSDT Database Update: Gigabyte H67 Motherboards

We're happy to announce another major update for Gigabyte Socket 1155 motherboards is in progress. As part of these updated DSDTs MacMan has included enhanced USB fixes, eliminating USB wake from sleep issues. These new devices fully implement the Rate Matching Hub definitions and Apple specific parameters. For this round, the following DSDTs have been extracted from BIOS, edited using the using minimal edits, and added to the DSDT Database.
  • Gigabyte GA-H61N-USB3 F4
  • Gigabyte GA-H61N-USB3 F5
  • Gigabyte GA-H61N-USB3 F7
  • Gigabyte GA-H61N-USB3 F8
  • Gigabyte GA-H67A-D3H-B3 F6
  • Gigabyte GA-H67A-D3H-B3 F7
  • Gigabyte GA-H67A-USB3-B3 F6
  • Gigabyte GA-H67A-USB3-B3 F7
  • Gigabyte GA-H67MA-D2H-B3-1.0 F5
  • Gigabyte GA-H67MA-D2H-B3-1.0 F6
  • Gigabyte GA-H67MA-D2H-B3-1.1 F5
  • Gigabyte GA-H67MA-D2H-B3-1.1 F6
  • Gigabyte GA-H67MA-UD2H-B3 F7
  • Gigabyte GA-H67MA-UD2H-B3 F8
  • Gigabyte GA-H67MA-USB3-B3 F5
  • Gigabyte GA-H67MA-USB3-B3 F6
  • Gigabyte GA-H67MA-USB3-B3 F8
  • Gigabyte GA-H67N-USB3-B3 F8
  • Gigabyte GA-H67N-USB3-B3 F9
  • Gigabyte GA-PH67-DS3-B3 F4
  • Gigabyte GA-PH67-DS3-B3 F5
  • Gigabyte GA-PH67-UD3-B3 F7
  • Gigabyte GA-PH67-UD3-B3 F8
  • Gigabyte GA-PH67A-UD3-B3 F8
  • Gigabyte GA-PH67A-UD3-B3 F9
NOTE: All DSDTs are verified extracts from the latest BIOS versions.

To use on an existing system, download and replace your /Extra/DSDT.aml. For a fresh install, instructions on MultiBeast's UserDSDT are available here. Be sure to only use the matching DSDT for your motherboard and BIOS version. 

-tonymacx86 & MacMan

DSDT Database Update: Gigabyte Z68 Motherboards

We're happy to announce another major update for Gigabyte Socket 1155 motherboards is in progress. As part of these updated DSDTs MacMan has included enhanced USB fixes, eliminating USB wake from sleep issues. These new devices fully implement the Rate Matching Hub definitions and Apple specific parameters. For the first round, the following DSDTs have been extracted from BIOS, edited using the using minimal edits, and added to the DSDT Database.
  • Gigabyte GA-Z68A-D3-B3 F10
  • Gigabyte GA-Z68A-D3-B3 F11
  • Gigabyte GA-Z68A-D3H-B3 F12
  • Gigabyte GA-Z68A-D3H-B3 F13
  • Gigabyte GA-Z68AP-D3-2.x FC
  • Gigabyte GA-Z68AP-D3-2.x FD
  • Gigabyte GA-Z68AP-D3 F7
  • Gigabyte GA-Z68AP-D3 F8
  • Gigabyte GA-Z68M-D2H F6
  • Gigabyte GA-Z68MA-D2H-B3 F10
  • Gigabyte GA-Z68MX-UD2H-B3 F13
  • Gigabyte GA-Z68P-DS3-2.x FD
  • Gigabyte GA-Z68P-DS3-2.x FE
  • Gigabyte GA-Z68P-DS3 F8
  • Gigabyte GA-Z68P-DS3 F9
  • Gigabyte GA-Z68X-UD3-B3 F12
  • Gigabyte GA-Z68X-UD3-B3 F13
  • Gigabyte GA-Z68X-UD3H-B3 F11
  • Gigabyte GA-Z68X-UD3H-B3 F12
  • Gigabyte GA-Z68X-UD3P-B3 F8
  • Gigabyte GA-Z68X-UD3R-B3 F7
  • Gigabyte GA-Z68X-UD4-B3 F10
  • Gigabyte GA-Z68X-UD5-B3 F10
  • Gigabyte GA-Z68X-UD7-B3 F10
  • Gigabyte GA-Z68XP-D3 F8
  • Gigabyte GA-Z68XP-D3 F9
  • Gigabyte GA-Z68XP-UD3 F9
  • Gigabyte GA-Z68XP-UD3 F10
  • Gigabyte GA-Z68XP-UD3-iSSD F9
  • Gigabyte GA-Z68XP-UD3-iSSD F10
  • Gigabyte GA-Z68XP-UD3P F7
  • Gigabyte GA-Z68XP-UD3R F6
  • Gigabyte GA-Z68XP-UD4 F6
  • Gigabyte GA-Z68XP-UD5 F6
NOTE: All DSDTs are verified extracts from the latest BIOS versions.

To use on an existing system, download and replace your /Extra/DSDT.aml. For a fresh install, instructions on MultiBeast's UserDSDT are available here. Be sure to only use the matching DSDT for your motherboard and BIOS version. 

-tonymacx86 & MacMan

Hackintosh Under the Hood: Post-Installation System Overview


Here's a great introduction to a working Mac OS X installation on PC hardware. The video explains the function and location of the Chameleon/Chimera boot file, /Extra folder, DSDT, .plist files, and .kext files. Produced and narrated by one of our mods, StingRay. 
For discussions on this and other topics, register today at tonymacx86.com!

DSDT Database Update - Gigabyte Sandy Bridge Socket 1155

MacMan just completed another round of DSDT Database updates, using the latest Gigabyte Socket 1155 motherboard BIOSes. Here's a list of the 106 DSDTs recently updated:
  • Gigabyte GA-H61-S3 F3
  • Gigabyte GA-H61M-D2-B3 F8
  • Gigabyte GA-H61M-D2H-USB3 F1
  • Gigabyte GA-H61M-D2H-USB3 F2
  • Gigabyte GA-H61M-D2P-B3 F6
  • Gigabyte GA-H61M-D2P-B3 F8
  • Gigabyte GA-H61M-D2P-B3 F9
  • Gigabyte GA-H61M-DS2 F2
  • Gigabyte GA-H61M-DS2 F3
  • Gigabyte GA-H61M-DS2-1.2 FA
  • Gigabyte GA-H61M-DS2-1.2 FB
  • Gigabyte GA-H61M-S2-B3 F3
  • Gigabyte GA-H61M-S2H F3
  • Gigabyte GA-H61M-S2H F4
  • Gigabyte GA-H61M-S2H F5
  • Gigabyte GA-H61M-S2P-B3 F4
  • Gigabyte GA-H61M-S2PV F2
  • Gigabyte GA-H61M-S2V-B3 F6
  • Gigabyte GA-H61M-USB3-B3 F9
  • Gigabyte GA-H61M-USB3-B3-2.x FB
  • Gigabyte GA-H61M-USB3-B3-2.x FC
  • Gigabyte GA-H61M-USB3-B3-2.x FD
  • Gigabyte GA-H61N-USB3 F3
  • Gigabyte GA-H61N-USB3-B3 F2-HDMI
  • Gigabyte GA-H67A-D3H-B3 F5
  • Gigabyte GA-H67M-D2-B3-1.0 F5
  • Gigabyte GA-H67M-D2-B3-1.1 F5
  • Gigabyte GA-H67MA-USB3-B3 F4
  • Gigabyte GA-HA65M-D2H-B3 F9
  • Gigabyte GA-HA65M-UD3H-B3 F6
  • Gigabyte GA-P61-DS3-B3 F4
  • Gigabyte GA-P61-S3-B3 F5
  • Gigabyte GA-P61-S3-B3-1.1 FA
  • Gigabyte GA-P61-S3-B3-1.1 FB
  • Gigabyte GA-P61-S3-B3-1.1 FC
  • Gigabyte GA-P61-S3-B3-1.2 F2
  • Gigabyte GA-P61-S3P F1
  • Gigabyte GA-P61-S3P F2
  • Gigabyte GA-P61-S3P F3
  • Gigabyte GA-P61-USB3-B3 F9
  • Gigabyte GA-P61-USB3P F1
  • Gigabyte GA-P61-USB3P F2
  • Gigabyte GA-P67-DS3-B3 F3
  • Gigabyte GA-P67-DS3-B3-2.x FA
  • Gigabyte GA-P67-DS3-B3-2.x FB
  • Gigabyte GA-P67-DS3-B3-2.x FC
  • Gigabyte GA-P67A-D3-B3 F5
  • Gigabyte GA-P67A-D3-B3-2.x FA
  • Gigabyte GA-P67A-D3-B3-2.x FB
  • Gigabyte GA-P67A-D3-B3-2.x FC
  • Gigabyte GA-P67A-UD3-B3 F6
  • Gigabyte GA-P67A-UD3-B3 F7
  • Gigabyte GA-P67A-UD3P-B3 F6
  • Gigabyte GA-P67A-UD3P-B3 F7
  • Gigabyte GA-P67A-UD3R-B3 F6
  • Gigabyte GA-P67A-UD3R-B3 F7
  • Gigabyte GA-P67A-UD4-B3 F6
  • Gigabyte GA-P67A-UD5-B3 F7
  • Gigabyte GA-P67A-UD7-B3 F6
  • Gigabyte GA-P67X-UD3-B3 F6
  • Gigabyte GA-P67X-UD3-B3 F7
  • Gigabyte GA-P67X-UD3R-B3 F5
  • Gigabyte GA-PA65-UD3-B3 F10
  • Gigabyte GA-PA65-UD3-B3 F9
  • Gigabyte GA-PH67-DS3-B3 F3
  • Gigabyte GA-PH67-UD3-B3 F5
  • Gigabyte GA-PH67-UD3-B3 F6
  • Gigabyte GA-PH67A-UD3-B3 F6
  • Gigabyte GA-PH67A-UD3-B3 F7
  • Gigabyte GA-Z68A-D3-B3 F7
  • Gigabyte GA-Z68A-D3-B3 F8
  • Gigabyte GA-Z68A-D3-B3 F9
  • Gigabyte GA-Z68A-D3H-B3 F11
  • Gigabyte GA-Z68AP-D3 F5
  • Gigabyte GA-Z68AP-D3 F6
  • Gigabyte GA-Z68AP-D3-2.x FA
  • Gigabyte GA-Z68AP-D3-2.x FB
  • Gigabyte GA-Z68M-D2H F5
  • Gigabyte GA-Z68MA-D2H-B3 F9
  • Gigabyte GA-Z68MX-UD2H-B3 F12
  • Gigabyte GA-Z68P-DS3 F5
  • Gigabyte GA-Z68P-DS3 F6
  • Gigabyte GA-Z68P-DS3 F7
  • Gigabyte GA-Z68P-DS3-2.x FA
  • Gigabyte GA-Z68P-DS3-2.x FB
  • Gigabyte GA-Z68P-DS3-2.x FC
  • Gigabyte GA-Z68X-UD3-B3 F11
  • Gigabyte GA-Z68X-UD3-B3 F9
  • Gigabyte GA-Z68X-UD3H-B3 F10
  • Gigabyte GA-Z68X-UD3P-B3 F7
  • Gigabyte GA-Z68X-UD3R-B3 F6
  • Gigabyte GA-Z68X-UD4-B3 F9
  • Gigabyte GA-Z68X-UD5-B3 F9
  • Gigabyte GA-Z68X-UD7-B3 F9
  • Gigabyte GA-Z68XP-D3 F5
  • Gigabyte GA-Z68XP-D3 F6
  • Gigabyte GA-Z68XP-D3 F7
  • Gigabyte GA-Z68XP-UD3 F7
  • Gigabyte GA-Z68XP-UD3 F8
  • Gigabyte GA-Z68XP-UD3-iSSD F6
  • Gigabyte GA-Z68XP-UD3-iSSD F7
  • Gigabyte GA-Z68XP-UD3-iSSD F8
  • Gigabyte GA-Z68XP-UD3P F6
  • Gigabyte GA-Z68XP-UD3R F5
  • Gigabyte GA-Z68XP-UD4 F5
  • Gigabyte GA-Z68XP-UD5 F5
NOTE: All DSDTs are verified extracts directly from the latest BIOS versions.

To use on an existing system, download and replace your /Extra/DSDT.aml. For a fresh install, instructions on MultiBeast's UserDSDT are available here. Be sure to only use the matching DSDT for your motherboard and BIOS version. 

-tonymacx86 & MacMan

DSDT Database: Gigabyte Socket 1155 Updates

MacMan's done a major update to the DSDT Database, adding verified edits for the latest BIOS versions of Gigabyte Socket 1155 motherboards. Here's a list of the Gigabyte motherboard DSDTs and BIOS versions recently updated:
  • Gigabyte GA-H61-S3-F1 
  • Gigabyte GA-H61-S3-F2 
  • Gigabyte GA-H61M-D2-B3-F7 
  • Gigabyte GA-H61M-DS2-F1 
  • Gigabyte GA-H61M-S2-B3-F2 
  • Gigabyte GA-H61M-S2H-F1 
  • Gigabyte GA-H61M-S2H-F2 
  • Gigabyte GA-H61M-S2P-B3-F1 
  • Gigabyte GA-H61M-S2P-B3-F2 
  • Gigabyte GA-H61M-S2P-B3-F3 
  • Gigabyte GA-H61M-S2V-B3-F5 
  • Gigabyte GA-H61M-USB3-B3-F7 
  • Gigabyte GA-H61M-USB3-B3-F8 
  • Gigabyte GA-H61N-USB3-F1 
  • Gigabyte GA-H61N-USB3-F2 
  • Gigabyte GA-H67A-D3H-B3-F4 
  • Gigabyte GA-H67N-USB3-B3-F6 
  • Gigabyte GA-H67N-USB3-B3-F7 
  • Gigabyte GA-HA65M-D2H-B3-F8 
  • Gigabyte GA-P61-DS3-B3-F3 
  • Gigabyte GA-P61-S3-B3-F4 
  • Gigabyte GA-P61-USB3-B3-F8 
  • Gigabyte GA-P67-DS3-B3-F2 
  • Gigabyte GA-P67A-D3-B3-F4 
  • Gigabyte GA-P67A-UD3-B3-F4
  • Gigabyte GA-P67A-UD3-B3-F5 
  • Gigabyte GA-P67A-UD3P-B3-F5 
  • Gigabyte GA-P67A-UD3R-B3-F5 
  • Gigabyte GA-P67A-UD4-B3-F5 
  • Gigabyte GA-P67A-UD5-B3-F6 
  • Gigabyte GA-P67A-UD7-B3-F5 
  • Gigabyte GA-P67X-UD3-B3-F5 
  • Gigabyte GA-P67X-UD3R-B3-F4 
  • Gigabyte GA-PA65-UD3-B3-F8 
  • Gigabyte GA-PH67-DS3-B3-F2 
  • Gigabyte GA-PH67-UD3-B3-F4 
  • Gigabyte GA-PH67A-D3-B3-F4 
  • Gigabyte GA-PH67A-UD3-B3-F5 
  • Gigabyte GA-Z68A-D3-B3-F6 
  • Gigabyte GA-Z68A-D3H-B3-F10 
  • Gigabyte GA-Z68AP-D3-F4 
  • Gigabyte GA-Z68M-D2H-F4 
  • Gigabyte GA-Z68MA-D2H-B3-F8 
  • Gigabyte GA-Z68MX-UD2H-B3-F9 
  • Gigabyte GA-Z68MX-UD2H-B3-F11 
  • Gigabyte GA-Z68P-DS3-F4 
  • Gigabyte GA-Z68X-UD3-B3-F6 
  • Gigabyte GA-Z68X-UD3-B3-F8 
  • Gigabyte GA-Z68X-UD3H-B3-F8 
  • Gigabyte GA-Z68X-UD3H-B3-F9 
  • Gigabyte GA-Z68X-UD3P-B3-F6 
  • Gigabyte GA-Z68X-UD3R-B3-F4 
  • Gigabyte GA-Z68X-UD3R-B3-F5 
  • Gigabyte GA-Z68X-UD4-B3-F8 
  • Gigabyte GA-Z68X-UD5-B3-F8 
  • Gigabyte GA-Z68X-UD7-B3-F8 
  • Gigabyte GA-Z68XP-D3-F4 
  • Gigabyte GA-Z68XP-UD3-F4 
  • Gigabyte GA-Z68XP-UD3-F6 
  • Gigabyte GA-Z68XP-UD3-iSSD-F5 
  • Gigabyte GA-Z68XP-UD3P-F4 
  • Gigabyte GA-Z68XP-UD3P-F5 
  • Gigabyte GA-Z68XP-UD3R-F3 
  • Gigabyte GA-Z68XP-UD3R-F4 
  • Gigabyte GA-Z68XP-UD4-F3 
  • Gigabyte GA-Z68XP-UD4-F4 
  • Gigabyte GA-Z68XP-UD5-F3 
  • Gigabyte GA-Z68XP-UD5-F4 
NOTE: All DSDTs are verified extracts from the latest BIOS versions.

To use on an existing system, download and replace your /Extra/DSDT.aml. For a fresh install, instructions on MultiBeast's UserDSDT are available here. Good luck, and let us know how it goes with these new additions to the DSDT Database!

-tonymacx86 & MacMan

HDMI Audio Solutions: Intel HD 3000 Graphics


We've recently figured out how to enable HDMI Audio on the Sandy Bridge Intel HD 3000 onboard graphics controller! This is a rather advanced procedure, and requires editing both your DSDT and the audio kexts. If you have a GA-H67N-USB3-B3 and want to test, or aren't up for the challenge, we've included pre-edited files at the end of this article.

Requirements:
  • Mac OS X 10.7.x Lion
  • Gigabyte Socket 1155 H61, H67, or Z68 Motherboard 
  • Intel Core i3/i5/i7 CPU featuring HD 3000 onboard graphics
    • Current Desktop Models: i3-2105, i3-2125, i5-2405S, i5-2500K, i7-2600K
  • Chimera v1.5 or later - available in MultiBeast 4.0: Lion Edition
  • Mac mini 5,1 system definition - available in MultiBeast 4.0: Lion Edition
  • AppleHDA.kext 2.1.1 or later (10.7.1)
    • If you've used AppleHDA Rollback, get a new 2.1.1 here
  • Plist Editor - like Plist Edit Pro 
  • Hex Editor - like Hex Fiend
  • DSDT Editor - like DSDTSE
  • Kext Installer - like KextBeast
NOTE: Most Gigabyte H61/H67/Z68 motherboards have Realtek ALC 889, so this guide will use that codec in the examples.

STEP 1: Edit AppleHDAHardwareConfigDriver.kext 
The first step is to add your onboard audio information to the AppleHDA hardware configuration plugin.

     1. Copy your unedited AppleHDA.kext to Desktop. Make sure it's v2.1.1 or later.
     2, Right-click AppleHDA.kext and choose Show Package Contents
     3. Open Contents/PlugIns/AppleHDAHardwareConfigDriver.kext/Contents/Info.plist
     4, Look for IOKitPersonalities > HDA Hardware Config Resource > HDAConfigDefault
     5. Remove all configurations (1-17) except 0
     6. Edit configuration 0 to match the following:
  • CodecID: 283,904,137
  • ConfigData: 21471C10 21471D40 21471E11 21471F01 21571C20 21571D10 21571E01 21571F01 21671C30 21671D60 21671E01 21671F01 21771C80 21771D20 21771E01 21771F01 21871C40 21871D90 21871EA1 21871F90 21971C50 21971D90 21971EA1 21971F02 21A71C60 21A71D30 21A71E81 21A71F01 21B71C70 21B71D40 21B71E21 21B71F02 21E71C90 21E71D61 21E71E4B 21E71F01 21F71CA0 21F71D71 21F71ECB 21F71F01
  • FuncGroup: 3
  • LayoutID: 889
STEP 2: Add Layout889.xml to AppleHDA.kext
The next step is to add codec-specific layout information to AppleHDA.

     1. Navigate to AppleHDA.kext/Contents/Resources/layout12.xml
     2. Right click layout12.xml, choose Duplicate
     3. Rename layout12 copy.xml to layout889.xml
     4. Open layout889.xml with Plist Edit Pro
     5. Edit the top 2 sections to match the following:
  • LayoutID: 889
  • CodecID: 283,904,137
     6. Save and copy layout889.xml to AppleHDA.kext/Contents/Resources
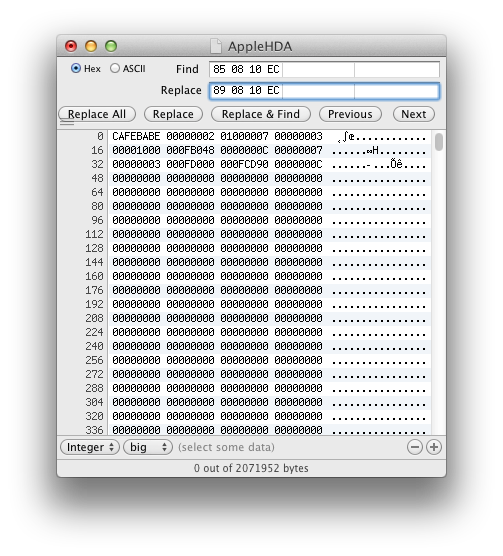
STEP 3: Binary Patch AppleHDA.kext (Optional)
If you plan to use onboard audio in addition to HDMI audio, you must patch the AppleHDA binary. If not, skip this step.

     1. Open AppleHDA.kext/Contents/MacOS/AppleHDA binary file using Hex Fiend
     2. Type command-F to initiate Find and Replace menu
     3. Enter 85 08 EC 10 in Find field,
     4. Enter 89 08 EC 10 in Replace field.
     5. Click Replace All
     6. Save file.
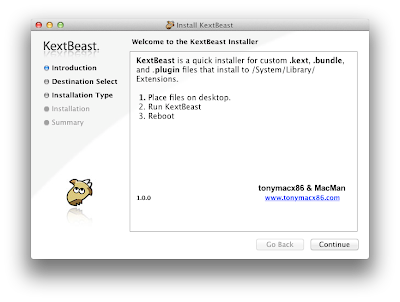
STEP 4: Install AppleHDA.kext
     1. Place patched AppleHDA.kext on Desktop
     2. Run KextBeast
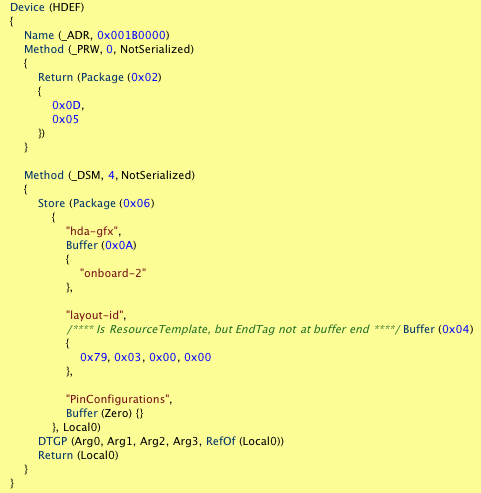
    STEP 5: DSDT Edits
    In order for the system to recognize that you want audio from the HDMI port, you have to edit your DSDT. This next step assumes you have already installed a pre-edited DSDT from our DSDT Database.

         1. Open your /Extra/DSDT.aml with DSDTSE
         2. Search for HDEF
         3. Add "hda-gfx" "onboard-2" code snippet to Device (HDEF) section as shown.


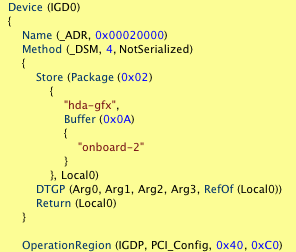
         4. Search for IGD0
         5. Add "hda-gfx" "onboard-2" code snippet to Device (IGD0) section as shown.


         6. Save and Compile
         7. Replace your /Extra/DSDT.aml with the new one.
      STEP 6: Compare Your Work (Optional)
      Download and compare your files vs. these verified versons. 
      STEP 6: Reboot
      Reboot system with the HDMI cable plugged at boot. Use the 2nd HDMI slot on the GA-H67N-USB3-B3. Congratulations! You're done!
      We'll be re-posting a series of guides updated for 10.7 Lion in the HDMI Audio section of the forum in the next week or so. These will show how to enable HDMI Audio on most compatible AMD and NVIDIA graphics cards. Special thanks to toleda for all the testing and research!

      Good luck!

      -tonymacx86 & MacMan

      Related Posts:
      Demystifying Mac OS X HDMI Audio
      HDMI Audio + Video Solutions
      For discussions on this and other topics, register today at tonymacx86.com!

      xMove + MultiBeast: Install OS X 10.7 Lion on any Supported Intel Core 2 or Core i based PC

      Any OSx86 installation guide can seem daunting at first glance, especially when trying to remember cryptic terminal commands and sorting through volumes of misinformation on the web. This guide requires no coding, terminal work, or Mac experience of any kind.

      Because Apple is only distributing OS X Lion through the Mac App Store, we had to rethink our retail installation method. What follows is our recommendation for the easiest, cleanest and most Mac-like installation process. For best results, follow this guide to the letter. 

      This guide is for the Retail OS X Lion App downloaded from the Mac App Store. If you are using the OS X Lion USB Thumb Drive, a new guide is coming soon. 

      You will need: 

      A System Running Mac OS X Snow Leopard 10.6.6 or later with:
      • Intel Core 2 or above, 64 bit CPU
      • Mac App Store Account + $29.99
      • Internet Access to Download 4GB OS X Lion App through Mac App Store
      • 4GB space available in /Applications
      • 8GB additional free space on your hard drive
      • Mac Pro 3,1 system definition and the latest Chimera Bootloader from MultiBeast
      Don't have Snow Leopard yet? To install Mac OS X Snow Leopard from the Retail DVD follow iBoot + MultiBeast

      STEP 1: Purchase OS X Lion from the Mac App Store

           1. Boot into your existing Snow Leopard installation.
           2. Download the OS X Lion App directly from the Mac App Store - it will automatically open.
           3. Click Continue.
      4. Target your currently booted Snow Leopard drive and hit Install. This will not install the OS or affect this drive in any way. It will simply install the files necessary to do so later in the process. 
           5. Click Restart to reboot.

      STEP 2: Prepare the Installer Partition

           1. Boot back into your existing Snow Leopard installation.
           2. Open /Applications/Utilities/Disk Utility
           3. Highlight your Snow Leopard drive in left column.
           4. Choose the Partition tab, and Click the + to Add a Partition.
           5. Name the secondary partition Installer with a size of 8 GB and click Apply

           6. Click Partition.
           7. Close Disk Utility

      STEP 3: xMove

           1. Download xMove
           2. Double-Click xMove, and choose Installer as Destination. 

      WARNING: DO NOT choose existing Snow Leopard as the Destination.
      Do not interrupt the process- it will only take a few minutes. When done, you'll have a secondary partition on your drive containing the OS X Lion Installer!

      If xMove fails, you haven't installed the Lion App to your currently booted drive- and it cannot find the necessary files. A quick way to remedy this is to manually mount the InstallESD.dmg and run xMove again. 

      STEP 4: Boot Installer & Install OS X Lion

           1. Reboot- at the Chimera boot screen, choose Installer
           2. It will boot directly to a familiar Mac OS X Installer complete with Disk Utility.
           3. Install OS X Lion over existing Snow Leopard or onto any empty drive or partition.

      If you've installed directly over an existing Snow Leopard installation, you're done! You should already have done proper post-installation steps on your existing Snow Leopard drive, so skip Step 5 and simply reboot into Lion!

      STEP 5: MultiBeast
      MultiBeast is an all-in-one post-installation tool designed to enable boot from hard drive, and install support for Audio, Network, and Graphics. It contains two different complete post-installation solutions: UserDSDT and EasyBeast. In addition it includes System Utilities to rebuild caches and repair permissions and a collection of drivers, boot loaders, boot time config files and handy software.

      Choose one of the following options directly following a fresh installation:  

      UserDSDT is a bare-minimum solution for those who have their own pre-edited DSDT. Place your DSDT.aml on the desktop before install. Audio, Graphics and Network will have to be enabled separately. Check out our DSDT Database to download your motherboard's pre-edited DSDT.

      EasyBeast is a DSDT-free solution for any Core2/Core i system. It installs all of the essentials to allow your system to boot from the hard drive. Audio, Graphics and Network will have to be enabled separately.  

           1. At Chimera boot screen, choose your freshly installed Lion drive
           2. Complete setup and registration routine
           3. When you get to the desktop, run MultiBeast
           4. If you have a custom pre-edited DSDT, place it on your desktop and choose UserDSDT
           5. All others select EasyBeast
           6. Select System Utilities
           7. Reboot to OS X Lion

      You may also use MultiBeast to install further drivers to enable ethernet, sound, graphics, etc... Be sure to read the documentation provided in MultiBeast Features.pdf about each option. Both UserDSDT and EasyBeast install the proper bootloader by default, so you'll not need to check that option.

           8. Optionally, you can now use Disk Utility to delete the Installer partition.

      Congratulations!


      You now have a fully updated bootable version of OS X Lion on your CustoMac! If you have any trouble, there are plenty of folks in the tonymacx86 forum with similar hardware to help out! Special thanks to all the hard work and effort of everyone involved in the community, all of our Mods for testing and retesting this method, and to Adamsmasher and Complx for the new logos!

      If you've had success using xMove + MultiBeast, consider a contribution to help keep the sites going.  We're constantly updating and tweaking our tools to help you.

      Thanks in advance!

      -tonymacx86 & MacMan

      Related Posts: 
      For discussions on this and other topics, register today at tonymacx86.com!

      MultiBeast 3.8 Update


      Today MultiBeast was updated to version 3.8. The latest version is now available at tonymacx86.com/downloads.

      Please do not upload or redistribute MultiBeast to any other sites. 

      Full list of changes:
      • Added to Customization -> Boot Options -> Generate CPU States. Adds GenerateCStates=Yes and GeneratePStates=Yes to /Extra/com.apple.boot.plist.
      • Added ATI 48xx Patch for 10.6.8 from netkas
      • Added to Drivers & Bootloaders -> Kexts & Enablers -> Miscellaneous -> IOPCIFamily Fix
      • Changed Drivers & Bootloaders -> Kexts & Enablers -> Miscellaneous -> FakeSMC Plugins to a menu choice.
      • Added to FakeSMC Plugins -> Motherboard Plugins which only installs the motherboard plugins.
      • Added to FakeSMC Plugins -> AMD RADEON Plugin which only installs the AMD RADEON GPU plugin.
      • Added to FakeSMC Plugins -> NVIDIA Plugin which only installs the NVIDIA GPU plugin.
      • Removed Chameleon 2.0 RC5 - Prerelease; superseded by Chimera
      • Removed NVEnabler; superseded by Chimera
      • Updated FakeSMC to 3.1.0 Revision 493
      • Updated FakeSMC Plugins to 3.1.0 Revision 493
      • Added IOPCIFamily Fix to EasyBeast
      • Added IOPCIFamily Fix to UserDSDT
      If this utility has helped you, please consider a contribution to support further MultiBeast development. Thanks in advance, and enjoy!

      -tonymacx86 & MacMan
      For discussions on this and other topics, register today at tonymacx86.com!

      DSDT Database Update: Gigabyte Socket 1155 - H61/H67/P67/Z68 Verified Edits

      We've done a major update to the DSDT Database, adding hand edited, verified DSDTs for all Gigabyte Socket 1155 motherboards. To clarify, based on weeks of testing with these motherboards, we've done only bare minimal edits to help enable sleep, Turbo/Speedstep/Power Management (without NullCPU), and audio using AppleHDA Rollback & ALC8xxHDA (without HDAEnablers). 

      Here's a list of the new DSDTs we've just added:
      • GA-H61M-D2-B3
      • GA-H61M-D2P-B3
      • GA-H61M-S2V-B3
      • GA-H61M-USB3-B3
      • GA-H67A-D3H-B3
      • GA-H67A-UD3H-B3
      • GA-H67A-USB3-B3
      • GA-H67M-D2-B3  - 1.0
      • GA-H67M-D2-B3 - 1.1
      • GA-H67M-UD2H-B3 - 1.0
      • GA-H67M-UD2H-B3 - 1.1
      • GA-H67MA-D2H-B3 - 1.0
      • GA-H67MA-D2H-B3 - 1.1
      • GA-H67MA-UD2H-B3
      • GA-H67MA-USB3-B3
      • GA-H67N-USB3-B3
      • GA-HA65M-D2H-B3
      • GA-HA65M-UD3H-B3
      • GA-P61-USB3-B3
      • GA-P67-DS3-B3
      • GA-P67A-D3-B3
      • GA-P67A-UD3- B3 - 1.0
      • GA-P67A-UD3- B3 - 1.1
      • GA-P67A-UD3P-B3
      • GA-P67A-UD3R-B3
      • GA-P67A-UD4-B3
      • GA-P67A-UD5-B3
      • GA-P67A-UD7-B3
      • GA-P67X-UD3-B3
      • GA-P67X-UD3R-B3
      • GA-PA65-UD3-B3
      • GA-PH67-DS3-B3
      • GA-PH67-UD3-B3
      • GA-PH67A-D3-B3
      • GA-PH67A-UD3-B3
      • GA-Z68A-D3-B3  
      • GA-Z68A-D3H-B3  
      • GA-Z68AP-D3
      • GA-Z68MA-D2H-B3  
      • GA-Z68MX-UD2H-B3  
      • GA-Z68P-DS3
      • GA-Z68X-UD3-B3  
      • GA-Z68X-UD3H-B3  
      • GA-Z68X-UD3P-B3  
      • GA-Z68X-UD3R-B3  
      • GA-Z68X-UD4-B3  
      • GA-Z68X-UD5-B3  
      • GA-Z68X-UD7-B3  
      • GA-Z68XP-D3
      • GA-Z68XP-UD3
      • GA-Z68XP-UD3-iSSD
      NOTE: All DSDTs are verified extracts from the latest BIOS versions.

      Instructions on how to use with MultiBeast's UserDSDT are available here. A full explanation and list of the Minimal Edits for Gigabyte Socket 1155 motherboards will be posted on MacMan's Blog. Good luck, and let us know how it goes with these new additions to the DSDT Database!

      -tonymacx86 & MacMan

      For discussions on this and other topics, register today at tonymacx86.com!

      MultiBeast 3.7 Update


      Today MultiBeast was updated to version 3.7.  The latest version is now available at tonymacx86.com/downloads.

      Please do not upload or redistribute MultiBeast to any other sites. 

      Full list of changes:
      • Upgraded Chimera to v1.4.1 r877
      • Upgraded Chameleon 2.0 RC5 - Prerelease to trunk r877
      • Replaced IntelThermal with IntelCPUMonitor in FakeSMC Plugins.
      • Removed Chameleon 2.0 RC5 - ATI Experimental; superseded by Chimera.
      • Removed Chameleon 2.0 RC5 - Sandy Bridge; superseded by Chimera.
      If this utility has helped you, please consider a contribution to support further MultiBeast development.  Thanks in advance, and enjoy!

      -tonymacx86 & MacMan
      For discussions on this and other topics, register today at tonymacx86.com!