Lnx2Mac Releases New RTL81xx Beta Realtek Network Driver


At long last! Lnx2Mac has released a new public beta version of his Realtek RTL81xx ethernet driver. It now supports every single Gigabyte 1156/1155/1366 motherboard that uses a Realtek ethernet controller!

Read all of the details and download the official installer on Lnx2Mac's Blog.

For discussions on this and other topics, register today at tonymacx86.com!

Change the Mission Control Background in Lion [QuickTip]


I don't usually recommend messing about with system files and images, but here's an easy and safe tweak for Lion. You know that grey fabric background of Mission Control? You can change it to whatever you like!


The image file is inside /System/Library/CoreServices/Dock.app, at /Contents/Resources/defaultdesktop.png. It is 256x256 pixels, and displays in tiled format. This gives the illusion of being one big image, while maintaining a small file size. If you edit this image, you're pretty much limited to colors and textures.

However, if you rename this image to defaultdesktop-old.png, or delete it, the Mission Control background becomes the system standard wallpaper.


The Andromeda Galaxy wallpaper location is /System/Library/CoreServices/DefaultDesktop.jpg. So, in order to make a full Mission Control background replacement, place your custom wallpaper in this location.

     1. Open Finder
     2. Navigate to /System/Library/CoreServices/DefaultDesktop.jpg
     3. Rename file DefaultDesktop-old.jpg
     4. Place any suitable wallpaper .jpg image in /System/Library/CoreServices/
     5. Rename file DefaultDesktop.jpg
     6. Log Out, then Log In


Further theming and tweaks can be done to other images in this folder. You similarly change such items as dashboard background, login screen, dock background, system preferences icons, and more. Be sure to back up before editing any of these files. Post your results in the Customization area of the forum here. Can't wait to see what you come up with!

Update: Just found the location of the Dashboard wallpaper- it's in the same location, but it's a much smaller file called pirelli.jpg. If you rename it in the same way, the default wallpaper is used for the background.


-tonymacx86 & MacMan
For discussions on this and other topics, register today at tonymacx86.com!

xMove 1.1 Update: Installation With the Retail OS X Lion USB Thumb Drive


Since the 10.7 Lion USB Thumb Drive became available, we've been inundated with requests for a method of using it for direct Lion installation. To this end, we've made a special new version of xMove. xMove now has 2 options- one for the traditional App Store method, and a new option that allows the USB Thumb Drive to be used to create the Installer partition.

xMove Guide for USB Thumb Drive 

      1. Boot into existing Snow Leopard installation
      2. Insert USB Thumb Drive
      3. Run xMove - targeting blank partition or drive
      4. Reboot and choose Installer
      5. Install Lion
Unfortunately, it is proving exceedingly difficult to boot the USB Thumb Drive directly. Because of the layout changes of the media in comparison to Snow Leopard, it's a multi-stage installation process necessitating changes to the bootloader. We are still actively testing and working on a method that will not require access to Snow Leopard 10.6 to install Lion, but there is no ETA for this as of yet. Until then, we recommend xMove + MultiBeast for retail installation.

Thanks for hanging in there and good luck!

-tonymacx86 & MacMan

Related Posts: 
For discussions on this and other topics, register today at tonymacx86.com!

rBoot: Rescue CD for Snow Leopard, Lion, and xMove

Introducing rBoot, the boot CD that works with Snow Leopard and Lion! It will even boot xMove created installer partitions. Available for download at tonymacx86.com/downloads.

Features:
  • No kernel included - boots both 10.6.x Snow Leopard and 10.7.x Lion installations.
  • Boots xMove-created 10.7 Lion Installer- will NOT boot the 10.7 Lion USB Thumb Drive
  • PCI Root graphics fix for Gigabyte motherboards - Asus, MSI, etc... may require PCIRootUID=0 at boot screen for full resolution
  • Chimera 1.5.4 bootloader
NOTE: iBoot is still our recommendation for initial installation and booting the Retail Snow Leopard 10.6 or 10.6 3 DVD.
    Please do not upload or redistribute rBoot to any other sites.  

    If this utility has helped you, please consider a contribution to support further rBoot development.  Thanks in advance, and enjoy!

    -tonymacx86 & MacMan
    For discussions on this and other topics, register today at tonymacx86.com!

    DSDT Database: Gigabyte Socket 1155 Updates

    MacMan's done a major update to the DSDT Database, adding verified edits for the latest BIOS versions of Gigabyte Socket 1155 motherboards. Here's a list of the Gigabyte motherboard DSDTs and BIOS versions recently updated:
    • Gigabyte GA-H61-S3-F1 
    • Gigabyte GA-H61-S3-F2 
    • Gigabyte GA-H61M-D2-B3-F7 
    • Gigabyte GA-H61M-DS2-F1 
    • Gigabyte GA-H61M-S2-B3-F2 
    • Gigabyte GA-H61M-S2H-F1 
    • Gigabyte GA-H61M-S2H-F2 
    • Gigabyte GA-H61M-S2P-B3-F1 
    • Gigabyte GA-H61M-S2P-B3-F2 
    • Gigabyte GA-H61M-S2P-B3-F3 
    • Gigabyte GA-H61M-S2V-B3-F5 
    • Gigabyte GA-H61M-USB3-B3-F7 
    • Gigabyte GA-H61M-USB3-B3-F8 
    • Gigabyte GA-H61N-USB3-F1 
    • Gigabyte GA-H61N-USB3-F2 
    • Gigabyte GA-H67A-D3H-B3-F4 
    • Gigabyte GA-H67N-USB3-B3-F6 
    • Gigabyte GA-H67N-USB3-B3-F7 
    • Gigabyte GA-HA65M-D2H-B3-F8 
    • Gigabyte GA-P61-DS3-B3-F3 
    • Gigabyte GA-P61-S3-B3-F4 
    • Gigabyte GA-P61-USB3-B3-F8 
    • Gigabyte GA-P67-DS3-B3-F2 
    • Gigabyte GA-P67A-D3-B3-F4 
    • Gigabyte GA-P67A-UD3-B3-F4
    • Gigabyte GA-P67A-UD3-B3-F5 
    • Gigabyte GA-P67A-UD3P-B3-F5 
    • Gigabyte GA-P67A-UD3R-B3-F5 
    • Gigabyte GA-P67A-UD4-B3-F5 
    • Gigabyte GA-P67A-UD5-B3-F6 
    • Gigabyte GA-P67A-UD7-B3-F5 
    • Gigabyte GA-P67X-UD3-B3-F5 
    • Gigabyte GA-P67X-UD3R-B3-F4 
    • Gigabyte GA-PA65-UD3-B3-F8 
    • Gigabyte GA-PH67-DS3-B3-F2 
    • Gigabyte GA-PH67-UD3-B3-F4 
    • Gigabyte GA-PH67A-D3-B3-F4 
    • Gigabyte GA-PH67A-UD3-B3-F5 
    • Gigabyte GA-Z68A-D3-B3-F6 
    • Gigabyte GA-Z68A-D3H-B3-F10 
    • Gigabyte GA-Z68AP-D3-F4 
    • Gigabyte GA-Z68M-D2H-F4 
    • Gigabyte GA-Z68MA-D2H-B3-F8 
    • Gigabyte GA-Z68MX-UD2H-B3-F9 
    • Gigabyte GA-Z68MX-UD2H-B3-F11 
    • Gigabyte GA-Z68P-DS3-F4 
    • Gigabyte GA-Z68X-UD3-B3-F6 
    • Gigabyte GA-Z68X-UD3-B3-F8 
    • Gigabyte GA-Z68X-UD3H-B3-F8 
    • Gigabyte GA-Z68X-UD3H-B3-F9 
    • Gigabyte GA-Z68X-UD3P-B3-F6 
    • Gigabyte GA-Z68X-UD3R-B3-F4 
    • Gigabyte GA-Z68X-UD3R-B3-F5 
    • Gigabyte GA-Z68X-UD4-B3-F8 
    • Gigabyte GA-Z68X-UD5-B3-F8 
    • Gigabyte GA-Z68X-UD7-B3-F8 
    • Gigabyte GA-Z68XP-D3-F4 
    • Gigabyte GA-Z68XP-UD3-F4 
    • Gigabyte GA-Z68XP-UD3-F6 
    • Gigabyte GA-Z68XP-UD3-iSSD-F5 
    • Gigabyte GA-Z68XP-UD3P-F4 
    • Gigabyte GA-Z68XP-UD3P-F5 
    • Gigabyte GA-Z68XP-UD3R-F3 
    • Gigabyte GA-Z68XP-UD3R-F4 
    • Gigabyte GA-Z68XP-UD4-F3 
    • Gigabyte GA-Z68XP-UD4-F4 
    • Gigabyte GA-Z68XP-UD5-F3 
    • Gigabyte GA-Z68XP-UD5-F4 
    NOTE: All DSDTs are verified extracts from the latest BIOS versions.

    To use on an existing system, download and replace your /Extra/DSDT.aml. For a fresh install, instructions on MultiBeast's UserDSDT are available here. Good luck, and let us know how it goes with these new additions to the DSDT Database!

    -tonymacx86 & MacMan

    Building a Sandy Bridge CustoMac: CustoMac Mini 2011

    We're super excited about the new support for onboard Intel HD 3000 graphics in Lion introduced in Chimera 1.5! This means is that it's now possible to build a smoking fast Mini-ITX rig without the need for a power hungry, and expensive graphics card! It even has working HDMI Audio!

    The CustoMac Mini 2011 prospective build is fully compatible with both the iBoot and xMove methods and has a pre-edited DSDT available in our DSDT Database for full optimization. 
      We've included all components besides monitor, keyboard and mouse, as any standard ones will do. You can use these recommendations as a jumping off point for further customization, or as a shopping list. Prices reflect lowest totals available on Amazon as of September 2011, and do not include shipping, tax, or rebates.

      CustoMac Mini 2011
      $322.60
         
      CPU: Intel Core i3-2105 with Intel HD 3000 Graphics - Amazon  Newegg 
      Motherboard: Gigabyte GA-H67N-USB3-B3 - Amazon  Newegg
      RAM: CORSAIR 8GB (2 x 4GB) 240-Pin DDR3 - Amazon  Newegg 
      Case + Power Supply Unit: APEX MI-008 Mini-ITX with 250w PSU - Amazon  Newegg

      Other Components: 
      Optical Drive: Sony Optiarc - Amazon  Newegg  $19.99
      Solid State Drive: Corsair Force Series 3 120GB SATA 6Gb/s - Amazon  Newegg $195.39
      Hard Drive: Seagate Barracuda 1 TB SATA 6Gb/s - Amazon  Newegg $59.58
      Operating System (10.6): Mac OS X Snow Leopard $29.00
      Operating System Upgrade (10.7): Mac OS X Lion $29.99

      Optional Accessories


      Remember, when building your own rig, it's easy to get frustrated- don't give up! There are users with similar specs in the tonymacx86 Forum to help you out if you get stuck. 


      Oh, and don't forget, if you end up buying anything, click through one of the links above or in the sidebar. That way, you'll be supporting the site, as well as getting the best prices. Thanks in advance! 

      Good luck, and let us know how it goes!

      HDMI Audio Solutions: Intel HD 3000 Graphics


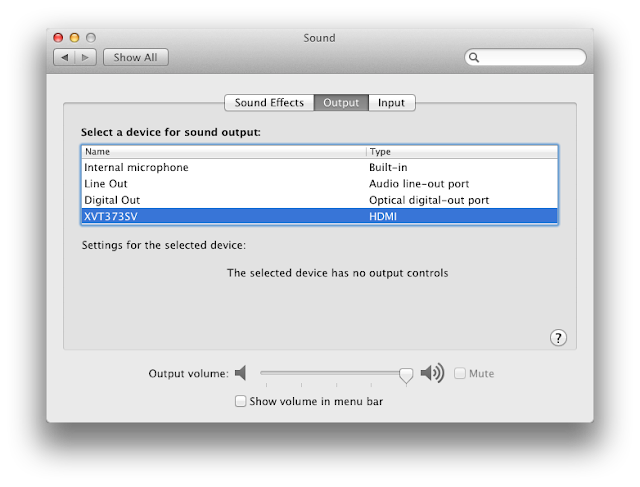
      We've recently figured out how to enable HDMI Audio on the Sandy Bridge Intel HD 3000 onboard graphics controller! This is a rather advanced procedure, and requires editing both your DSDT and the audio kexts. If you have a GA-H67N-USB3-B3 and want to test, or aren't up for the challenge, we've included pre-edited files at the end of this article.

      Requirements:
      • Mac OS X 10.7.x Lion
      • Gigabyte Socket 1155 H61, H67, or Z68 Motherboard 
      • Intel Core i3/i5/i7 CPU featuring HD 3000 onboard graphics
        • Current Desktop Models: i3-2105, i3-2125, i5-2405S, i5-2500K, i7-2600K
      • Chimera v1.5 or later - available in MultiBeast 4.0: Lion Edition
      • Mac mini 5,1 system definition - available in MultiBeast 4.0: Lion Edition
      • AppleHDA.kext 2.1.1 or later (10.7.1)
        • If you've used AppleHDA Rollback, get a new 2.1.1 here
      • Plist Editor - like Plist Edit Pro 
      • Hex Editor - like Hex Fiend
      • DSDT Editor - like DSDTSE
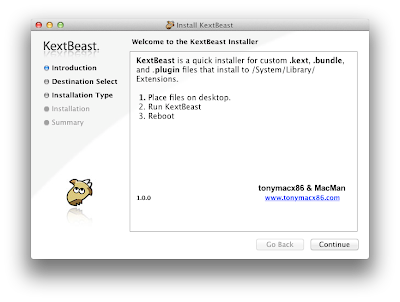
      • Kext Installer - like KextBeast
      NOTE: Most Gigabyte H61/H67/Z68 motherboards have Realtek ALC 889, so this guide will use that codec in the examples.

      STEP 1: Edit AppleHDAHardwareConfigDriver.kext 
      The first step is to add your onboard audio information to the AppleHDA hardware configuration plugin.

           1. Copy your unedited AppleHDA.kext to Desktop. Make sure it's v2.1.1 or later.
           2, Right-click AppleHDA.kext and choose Show Package Contents
           3. Open Contents/PlugIns/AppleHDAHardwareConfigDriver.kext/Contents/Info.plist
           4, Look for IOKitPersonalities > HDA Hardware Config Resource > HDAConfigDefault
           5. Remove all configurations (1-17) except 0
           6. Edit configuration 0 to match the following:
      • CodecID: 283,904,137
      • ConfigData: 21471C10 21471D40 21471E11 21471F01 21571C20 21571D10 21571E01 21571F01 21671C30 21671D60 21671E01 21671F01 21771C80 21771D20 21771E01 21771F01 21871C40 21871D90 21871EA1 21871F90 21971C50 21971D90 21971EA1 21971F02 21A71C60 21A71D30 21A71E81 21A71F01 21B71C70 21B71D40 21B71E21 21B71F02 21E71C90 21E71D61 21E71E4B 21E71F01 21F71CA0 21F71D71 21F71ECB 21F71F01
      • FuncGroup: 3
      • LayoutID: 889
      STEP 2: Add Layout889.xml to AppleHDA.kext
      The next step is to add codec-specific layout information to AppleHDA.

           1. Navigate to AppleHDA.kext/Contents/Resources/layout12.xml
           2. Right click layout12.xml, choose Duplicate
           3. Rename layout12 copy.xml to layout889.xml
           4. Open layout889.xml with Plist Edit Pro
           5. Edit the top 2 sections to match the following:
      • LayoutID: 889
      • CodecID: 283,904,137
           6. Save and copy layout889.xml to AppleHDA.kext/Contents/Resources
      STEP 3: Binary Patch AppleHDA.kext (Optional)
      If you plan to use onboard audio in addition to HDMI audio, you must patch the AppleHDA binary. If not, skip this step.

           1. Open AppleHDA.kext/Contents/MacOS/AppleHDA binary file using Hex Fiend
           2. Type command-F to initiate Find and Replace menu
           3. Enter 85 08 EC 10 in Find field,
           4. Enter 89 08 EC 10 in Replace field.
           5. Click Replace All
           6. Save file.
      STEP 4: Install AppleHDA.kext
           1. Place patched AppleHDA.kext on Desktop
           2. Run KextBeast
        STEP 5: DSDT Edits
        In order for the system to recognize that you want audio from the HDMI port, you have to edit your DSDT. This next step assumes you have already installed a pre-edited DSDT from our DSDT Database.

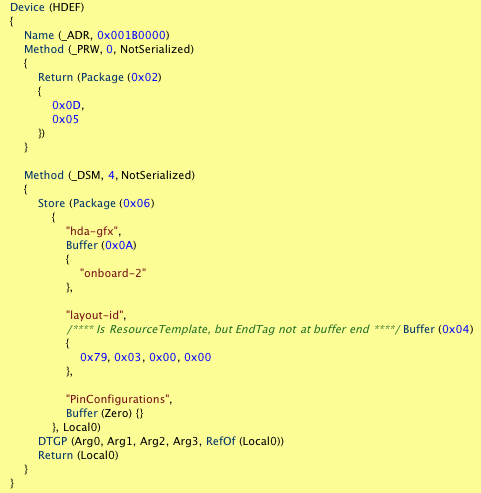
             1. Open your /Extra/DSDT.aml with DSDTSE
             2. Search for HDEF
             3. Add "hda-gfx" "onboard-2" code snippet to Device (HDEF) section as shown.


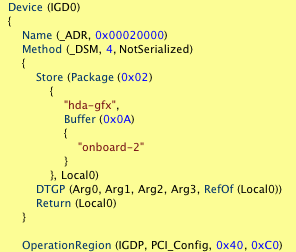
             4. Search for IGD0
             5. Add "hda-gfx" "onboard-2" code snippet to Device (IGD0) section as shown.


             6. Save and Compile
             7. Replace your /Extra/DSDT.aml with the new one.
          STEP 6: Compare Your Work (Optional)
          Download and compare your files vs. these verified versons. 
          STEP 6: Reboot
          Reboot system with the HDMI cable plugged at boot. Use the 2nd HDMI slot on the GA-H67N-USB3-B3. Congratulations! You're done!
          We'll be re-posting a series of guides updated for 10.7 Lion in the HDMI Audio section of the forum in the next week or so. These will show how to enable HDMI Audio on most compatible AMD and NVIDIA graphics cards. Special thanks to toleda for all the testing and research!

          Good luck!

          -tonymacx86 & MacMan

          Related Posts:
          Demystifying Mac OS X HDMI Audio
          HDMI Audio + Video Solutions
          For discussions on this and other topics, register today at tonymacx86.com!

          MultiBeast 4.0: Lion Edition


          Today MultiBeast was updated to version 4.0, specifically for Lion. MultiBeast 4.0: Lion Edition is ONLY for 10.7.x. For 10.6.x, use MultiBeast 3.9: Snow Leopard Edition. The latest versions are now available at tonymacx86.com/downloads

          Please do not upload or redistribute MultiBeast to any other sites. 

          Full list of changes:
          • Added Extension Migration Tool which copies the contents of /Extra/Extensions to /System/Library/Extensions and deletes /Extra/Extensions and /Extra/Extension.mkext. It will also add UseKernelCache=Yes to /Extra/org.chameleon.Boot.plist
          • Replaced Chimera v1.4.1 r877 with v1.5.4 r1394. This version adds GraphicsEnabler support for additional ATI and NVIDIA cards along with adding support for the Intel HD 3000 GPU in Sandy Bridge CPUs. Also includes olegpronin's Facetime fix for non-RAID volumes. You need to add SkipFTFix=Yes to /Extra/org.chameleon.Boot.plist when booting from a RAID volume.
          • Added to Customization -> Boot Options -> PCI Configuration Fix. Adds npci=0x2000 to Kernel Flags in /Extra/org.chameleon.Boot.plist  
          • Added to Customization -> Boot Options -> Use KernelCache. Adds UseKernelCache=Yes to /Extra/org.chameleon.Boot.plist  
          • Added VoodooHDA 0.2.7.3 with prefPane to Advanced Options -> Kexts -> Audio -> VoodooHDA
          • Added NVIDIA Fermi OpenCL Enabler to Graphics. This patches GeForceGLDriver using patch info from netkas.org
          • Added ATI 48xx Patch for 10.7.0 from netkas to Graphics
          • Added ATI 48xx Patch for 10.7.1 from netkas to Graphics
          • Added Macmini5,1 smbios
          • Replaced JMicron36x SATA with 3rdParty SATA. This new kext supports ASMEDIA, JMicron and Marvell SATA controllers.
          • Replaced JMicron36x eSATA with 3rdParty eSATA. This new kext supports ASMEDIA, JMicron and Marvell SATA controllers.
          • Replaced IOPCIFamily Fix with Customization -> Boot Options -> PCI Configuration Fix.
          • Removed USB 3.0
          • Removed ATI 48xx Patch for 10.6.3
          • Removed ATI 48xx Patch for 10.6.4
          • Removed ATI 48xx Patch for 10.6.4 Graphics Update
          • Removed ATI 48xx Patch for 10.6.5
          • Removed ATI 48xx Patch for 10.6.6
          • Removed ATI 48xx Patch for 10.6.7
          • Removed ATI 48xx Patch for 10.6.8
          • Removed Kext Helper b7
          • Removed MSR Tools
          • Updated all kext installations to install to /System/Library/Extenstions instead of /Extra/Extensions
          • Installation of Chimera will rename /Extra/com.apple.Boot.plist to /Extra/org.chameleon.Boot.plist
          • Added npci=0x2000 to all kernel flags
          • Updated EasyBeast and UserDSDT to install Chimera v1.5.4 r1394
          • Updated EasyBeast to use 3rdParty SATA instead of JMircon 36x SATA.
          • Updated Kext Utility to 2.5.0b
          • Changed all boot options choices to use org.chameleon.Boot.plist
          If this utility has helped you, please consider a contribution to support further MultiBeast development. Thanks in advance, and enjoy!

          -tonymacx86 & MacMan
          For discussions on this and other topics, register today at tonymacx86.com!

          Chimera 1.5.4 Update: FaceTime Fix

          Today MacMan updated Chimera to version 1.5.4 with a FaceTime fix for OS X Lion. 

          Chimera v1.5.4 Changes:
          • Based on Chameleon 2.0 revision 1394
          • FaceTime Fix for OS X Lion 10.7.x - Credit to olegpronin
          • New boot flag required for RAID 0 boot only - SkipFTFix=Yes
            • Disables the FaceTime Fix code that is currently incompatible with RAID 0. Thanks to Lnx2Mac for the idea.
          • Added additional GTX 570 device id
          • Changed default frame buffer to Bullrushes for all 6670 and 6450 models
          • Added card-specific GraphicsEnabler information for the following: 
            • 3 additional Radeon HD 6870 models
            • 1 additional Radeon HD 6850 model
            • 1 additional Radeon HD 6750 model
            • 2 additional Radeon HD 6670 models
          NOTE: Proper drivers are required for full graphics support.
            There is a standalone installer, available at tonymacx86.com/downloads. For bug reporting, feature requests, and general feedback please use the Chimera forum.

            To read the full list of changes, and detailed explanation behind them, check out MacMan's Blog.

            -tonymacx86 & MacMan
            For discussions on this and other topics, register today at tonymacx86.com!