UniBeast: Install Mac OS X Lion Using an All-In-One Bootable USB Drive

Introducing UniBeast- our new tool to create a bootable USB drive from your Mac App Store purchased copy of Install Mac OS X Lion or Apple Store purchased Mac OS X Lion USB Thumb Drive. This all-in-one bootable USB drive can also be used as a rescue boot drive for system recovery.

UniBeast + MultiBeast is the easiest method to do a clean install of Mac OS X Lion or update any Snow Leopard system. The following guide requires no coding, terminal work, or Mac experience of any kind. 

You Will Need

8GB or larger USB Drive

Install Mac OS X Lion Application
OR
Mac OS X Lion USB Thumb Drive
STEP 1: Purchase Mac OS X Lion 
The operating system is not free. There are two ways to purchase your copy of Mac OS X Lion. The simplest way is to download the Application from the Mac App Store. Alternately, the OS X Lion USB Thumb is available online at Apple.com or any Apple Store retail location. 

STEP 2: Create a Bootable USB Drive Using UniBeast
Take a deep breath and take your time- this is pretty simple, but it's easy to miss things if you rush. Follow each step to the letter.

     1. Insert USB drive
     2. Open /Applications/Utilities/Disk Utility
     3. Highlight USB drive in left column
     4. Click Partition tab
     5. Click Current and choose 1 Partition

     6. Click Options...
     7. Choose Master Boot Record
     8. Under Name: type USB (You can rename it later)
     9. Under Format: choose Mac OS Extended (Journaled)
     10. Click Apply then Partition
     11. If using the Install Mac OS X Lion Application, it must be in /Applications folder.
     12. If using the Mac OS X Lion USB Thumb Drive, make sure it's plugged in and mounted.
     13. Download and run UniBeast
     14. Click Continue, ContinueContinue, Agree
     15. At Destination Select, choose USB and click Continue
     16. If using the Mac App Store "Install Mac OS X Lion" App choose that option.
     17. If using the Apple Store "OS X Lion USB Thumb Drive" choose that option.
     18. If using a laptop, choose Laptop Support in addition to one of the above options.
     19. Click Continue
     20. Enter password and click Install

The process will take about 10-15 minutes, depending on system and drive speed, but will show hours. Do not unplug or stop during this time.

STEP 3: Install Mac OS X Lion
You're almost done! All you need to do is boot from the USB drive and install! Your hard drive should be set in BIOS to AHCI mode. For recommended BIOS settings and screenshots, check out iBoot + MultiBeast.

     1. If you have a Gigabyte motherboard press F12 to choose boot device.
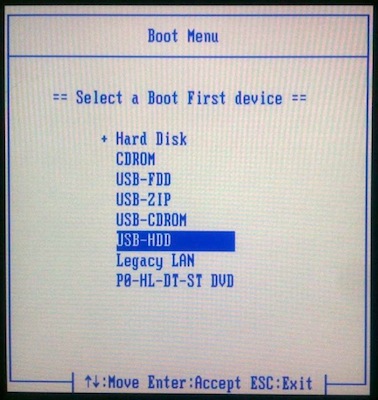

     2. Choose USB-HDD
     3. At Chimera Boot Screen, choose USB

You may have to type extra command line flags to reach the installer. 
  • Asus Motherboard + NVIDIA Graphics - type PCIRootUID=0
  • Unsupported graphics - type GraphicsEnabler=No
  • Boot in Single-user mode - type -s
  • Boot in Verbose mode - type -v
  • Boot in Safe mode - type -x

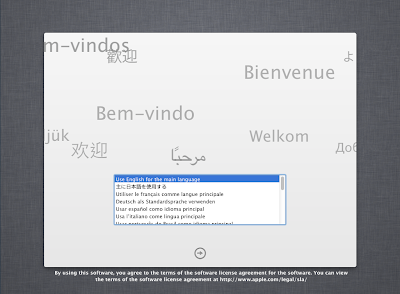
     4. When you arrive at the Installer, choose language.

If updating an existing Snow Leopard install, skip 5-14.

     5. In the top menubar choose Utilities, and open Disk Utility
     6. Highlight your target hard drive for the Lion installation in left column. 
     7. Click Partition tab
     8. Click Current and choose 1 Partition
     9. Click Options...
     10. Choose GUID Partition Method
     11. Under Name: type Lion  (You can rename it later)
     12. Under Format: choose Mac OS Extended (Journaled)
     13. Click Apply then Partition
     14. Close Disk Utility
     15. When the installer asks you where to install, choose Lion, or your existing install.
     16. Upon completion, restart system

The installation is complete, but the drive isn't bootable yet. Boot from the USB again, this time choosing Lion.

     17. If you have a Gigabyte motherboard, press F12 to choose boot device.
     18. Choose USB-HDD
     19. At Chimera Boot Screen, choose your new Lion installation.


STEP 4: Post-Installation Using MultiBeast
MultiBeast is an all-in-one post-installation tool designed to enable boot from hard drive, and install support for Audio, Network, and Graphics. In addition it includes System Utilities to repair permissions and a collection of drivers, bootloaders, config files and handy software.

     1. Complete Mac OS X Lion setup.
     2. When you arrive at desktop, open Safari
Note, if Safari crashes, disable Web Content: Browser Plug-Ins under Preferences>Security.
     3. Browse to tonymacx86.com and log in. If you don't have a user account, create one!
     4. Go to tonymacx86.com/downloads to download the latest MultiBeast
     5. Go to the DSDT Database to download your motherboard's DSDT
     6. Open Downloads folder and move the .aml file to the Desktop
     7. Open and run Multibeast's UserDSDT
     8. Restart system

If your drive doesn't boot on its own, and you get an error referencing boot0, fix it using the methods listed here.
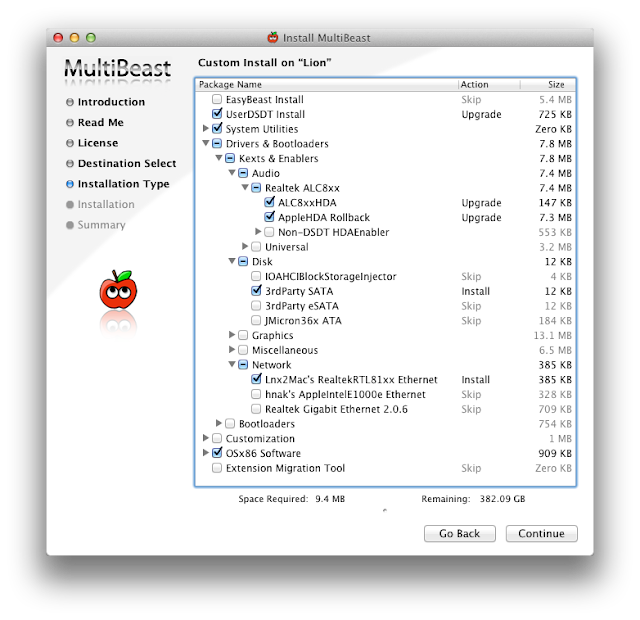

The above photo will provide general post-installation support for any recommended CustoMac build

You may also use MultiBeast to install further drivers to enable ethernet, sound, graphics, etc... Be sure to read the documentation provided in MultiBeast Features.pdf about each option. Both UserDSDT and EasyBeast install the proper bootloader by default, so you'll not need to check that option.

Congratulations!


You now have a fully updated bootable version of Mac OS X Lion on your CustoMac! And a handy USB rescue drive to boot from in case things go pear-shaped. It's easy to get frustrated, but don't give up! If you get stuck, there are many users with similar hardware in the tonymacx86 Forum to provide support. Special thanks to everyone in the community, and our Mods for testing!

If you've had success using this guide, consider a contribution to help keep the sites going. We're constantly updating and tweaking our tools to help you.

Good luck and have fun!

-tonymacx86 & MacMan

Related Posts: 

For discussions on this and other topics, register today at tonymacx86.com!

Chimera 1.6 Update

Today MacMan updated Chimera to version 1.6. 

Chimera v1.6.0 Changes:
  • Based on Chameleon 2.0 r1394
  • Back-ported new FaceTime fix with RAID 0 support from Chameleon 2.1svn r1649
  • Enhanced verbose messages from ati.c
  • Added support for additional AMD graphics cards
    • 0x68A1, ATI Mobility Radeon HD 5850 
    • 0x68B8, ATI Radeon HD 5770 
    • 0x68C0, ATI Mobility Radeon HD 5730  
    • 0x68C1, ATI Mobility Radeon HD 5650 
    • 0x6739, AMD Radeon HD 6850  
    • 0x6740, AMD Radeon HD 6770M 
    • 0x6741, AMD Radeon HD 6630M 
    • 0x6758, AMD Radeon HD 6670 
    • 0x6760, AMD Radeon HD 6490M 
    • 0x6720, AMD Radeon HD 6900M Series 
    • 0x6761, AMD Radeon HD 6430M Series 
  • Added support for Nvidia Quadro NVS 4200M
NOTE: Proper drivers are required for full graphics support.
    There is a standalone installer, available at tonymacx86.com/downloads. For bug reporting, feature requests, and general feedback please use the Chimera forum.

    -tonymacx86 & MacMan
    For discussions on this and other topics, register today at tonymacx86.com!

    Forum News: Golden Threads Section Added

    In our ongoing quest to organize the volumes of information collected in the tonymacx86 Forum, we've opened a brand new area called Golden Threads. The articles collected here represent the very best of our community, and are a great source of information for those with and without experience.

    Hope you enjoy! If you think there are any golden threads we missed, let us know in the comments. Special thanks to Complx for the logo!
    For discussions on this and other topics, register today at tonymacx86.com!

    Update Your Retail Mac OS X Lion App to 10.7.2 [QuickTip]

    The original installation media for Mac OS X Snow Leopard was a 10.6 DVD. The DVD was only updated once to version 10.6.3. In order to provide more frequent updates to users, Apple is now slipstreaming the latest version of Lion directly into the download. Upon fresh installation, no updating is necessary!

    If you purchased Lion from the App Store prior to October 12, 2011, you have either 10.7.0 or 10.7.1. To re-download and update your App to 10.7.2, follow this simple procedure.

         1. Delete your existing copy of Install Mac OS X Lion.app from Applications folder.
         2. Hold down the alt/option key on your keyboard, and click the App Store icon.
         3. With alt/option key held, click on Purchased
         4. With alt/option key held, click on OS X Lion
         5. With alt/option key held, click on Install

    The Installed button should change to Install, allowing you to re-download Lion. When the download finishes, the app will automatically open. The updated 10.7.2 Install Mac OS X Lion App can be found in the Applications folder.


    If this doesn't work for you, try creating a new User account. You can delete it later.

         1. Open System Preferences
         2. Click on Accounts
         3. Click Lock Icon
         4. Click (+) to add a new User
         5. Create a new Admin User
         6. Log out, and log into new User
         7. Proceed with steps above.
    For discussions on this and other topics, register today at tonymacx86.com!

    Mac OS X 10.7.2 Update

    Today Apple released Mac OS X 10.7.2 the 2nd major update to Mac OS X Lion. This is the first time all Macs are running the same build of Mac OS X Lion, Build 11C74. It is an extremely important update, rolling in iCloud integration, and is recommended for all users. To update for any supported configuration, do not use Software Update. We recommend that all users update systems using the standalone Combo installer.


    Be sure to back up any important data, and if possible clone your hard drive before applying the update. Testing is underway. Report your results in the forum here
    Apple has also launched its new iCloud service with many other updates. iTunes 10.5  was released yesterday with support for iTunes in the Cloud and over the air syncing. iOS 5 was released today for iPad, iPhone, and iPod touch. iPhoto was updated to version 9.2 with support for iCloud's Photostream service.


    What we know about 10.7.2 so far...
    • iCloud features integrated into Mac OS X
    • 11.2.0 Darwin kernel
    • Improved AMD, Intel, and NVIDIA Graphics Drivers
      • If you use customized or edited graphics kexts, most likely you'll have to make the edits again using the updated drivers as a base.
    • The update will replace your AppleHDA.kext. 
      • If you use ALC8xxHDA for onboard audio, you will have to reinstall AppleHDA Rollback using MultiBeast before rebooting. If you're using VoodooHDA, you will not need to make any modifications.
      • MultiBeast will soon support AppleHDA patching for onboard audio- stay tuned!
    • If you use Sleepenabler.kext, remove before updating.
    If you have any issues booting post-update, boot using rBoot Rescue CD. Good luck, and let us know how it goes!
      For discussions on this and other topics, register today at tonymacx86.com!

      Demystifying HDMI Audio in Mac OS X 10.7 Lion


      HDMI Audio + Video can be enabled on Mac OS X Lion for most graphics card and motherboard configurations without much hassle using the replacement audio driver VoodooHDA. Using the supplied AppleHDA.kext for HDMI audio is something of a challenge, but provides numerous benefits including native Mac OS X support, high quality digital surround audio and overall system integration.

      Since Lion's launch, tonymacx86.com mod toleda has been exploring and experimenting using different methods, and has come up with what we think is a pretty definitive series of guides on the subject. Please note that this is an advanced process and is highly dependent on your exact hardware configuration.

      Enabling HDMI audio in Mac OS X 10.7.x is comprised of three parts and six guides:

      Part 1: HDMI Audio Requirements 
      Determines if your system is capable of HDMI audio.

      Part 2: HDMI Audio DSDT Edits
      Configures your motherboard for HDMI audio.
           2a. Discrete Graphics - AMD/Nvidia
           2b. Integrated Graphics - Intel HD 3000

      Part 3: HDMI Audio Kext Edits
      Customizes Mac OS X for your graphics card.
           3a. AMD HD 5xxx and HD 6xxx
           3b. Nvidia GT/S/X 4xx and GT/S/X 5xx
           3c. Intel HD3000 Integrated Graphics


      Check out the HDMI Audio subforum set up to host toleda's guides and general troubleshooting topics. Good luck, and let us know how it works for you!

      -tonymacx86, toleda & MacMan
      For discussions on this and other topics, register today at tonymacx86.com!

      iBoot 3.2 Update


      iBoot has been updated to 3.2. As always, this boot CD facilitates the direct retail installation of Mac OS X 10.6.x Snow Leopard via iBoot + MultiBeast. Pick up the latest version at tonymacx86.com/downloads
      • Updated bootloader to Chimera v1.5.4
      • Updated Lnx2Mac's Realtek RTL81xx Ethernet Driver to v0.0.90
      • For 10.6.x Snow Leopard only
        Please do not upload or redistribute iBoot to any other sites.  


        If this utility has helped you, please consider a contribution to support further iBoot development.  Thanks in advance, and enjoy!

        -tonymacx86 & MacMan
        For discussions on this and other topics, register today at tonymacx86.com!

        Steve Jobs: 1955-2011