Intel Core i3/i5 Dual-Core Processors and Mac OS X

EDIT: As of the release of Apple's new MacBook Pros, i3/i5/i7 notebook processors are supported!  Just use the new 10.3.1 Darwin Vanilla kernel.  It's available through the MacBook Pro Software Update.  Check out this thread for details on installation.

Intel's new Dual-Core Core i3 and Core i5 processors are currently (as of 10.6.2) not supported natively by Mac OS X. Furthermore, recent looks into the 10.6.3 developer build don't reveal any future support. This includes the following dual-core desktop and mobile processors:

Core i3-530
Core i3-540
Core i5-650
Core i5-660
Core i5-661
Core i5-670
Core i3-330M
Core i3-350M
Core i5-520UM
Core i5-430M
Core i5-520M
Core i5-520E
Core i5-540M

If you own one of these processors, and would like to try to install Mac OS X, you can try my Boot CD Method with the default tonymacx86-P55BootCD. It has the Qoopz 10.0.0 kernel which is patched to run on unsupported processors. Issue this command at the Chameleon prompt:

busratio=20

If you don't type this command, your computer may instantly reboot. Also, when you update to 10.6.2, you'll have to use a patched kernel.

METHOD FOR UPDATING TO 10.6.2
  1. Download the Mac OS X 10.6.2 Combo Update here:
  2. http://www.apple.com/downloads/macosx/apple/macosx_updates/macosxv1062updatecombo.html
  3. Download MultiBeast
  4. Mount MacOSXUpdCombo10.6.2.dmg
  5. Install MacOSXUpdCombo10.6.2.pkg
  6. DO NOT REBOOT
  7. Run EasyBeast 10.6.2 Unsupported to install the patched mach_kernel.
  8. Reboot.
As of now the only Core i-series Intel processors that Apple has used in a Mac are the quad-core Core i5 750 and Core i7 860. Therefore these are the only ones that are supported natively by Mac OS X, and can therefore run the 10.6.2 Vanilla (default) kernel. Of course, Apple may release new Macs that run these processors, and at that point, they'll be supported.

EDIT: Here's a table of all of the actual bus/core ratios for every Intel Core i processor:


If you have had any success or failures using these new processors, be sure to let me know. Good luck!
For discussions on this and other topics, register today at tonymacx86.com!

Advanced DSDT Fixes: nVidia Graphics

I've been receiving a lot of requests to do a step by step guide on how to enable graphics by DSDT injection. As stated in my post Enable Full Graphics Card Acceleration, there are many ways to enable graphics on your Hackintosh. This guide will allow you to directly inject information via your DSDT, therefore eliminating the use of methods such as Enabler kexts, or EFI Strings.

NOTE TO ATI USERS: I did not include a solution for ATI graphics card in this post. Although you could probably work it out, I do not own an ATI card, so I can't test. I'd love to duplicate this post for ATI users. Contact me on the forum if you've successfully injected DSDT code for ATI cards. Download an untested example of the code- the process seems a bit more involved.

BEFORE YOU BEGIN
This guide assumes you've read and understand the following DSDT posts, and are familiar with the editing process. You will need to have enabled full graphics acceleration (QE/CI) via Enabler kext or EFI Strings.
You will also need to have XCode, Apple's Development platform for OS X installed on your system. It is an optional install on your Mac OS X Retail DVD. You can also download the full version for free here.

The main tool we'll be using is IORegistryExplorer which is located in /Developer/Applications/Utilities on the root of your Snow Leopard drive. This application gives us a view of the hardware registry. I encourage you to explore the full version of XCode, but if you want to simply get the IORegistryExplorer application only, it is available here.

STEP 1: INSERT DSDT GRAPHICS CODE TEMPLATE
In this step you will insert a template of DSDT code from tonymacx86-DSDT-FIXES.dsl into your DSDT.aml that will enable Graphics detection.
  1. Download the updated tonymacx86-DSDT-FIXES.zip
  2. Open DSDTSE. You can download the application from here.
  3. Open tonymacx86-DSDT-FIXES.dsl in DSDTSE.
  4. Locate 09 - DSDT Graphics - nVidia
  5. Open your DSDT.aml in DSDTSE.
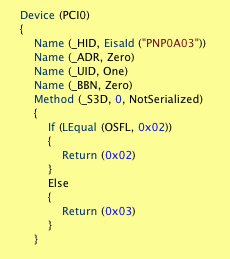
  6. Type Device (PCI0) in the search box.
  7. You'll see something like this:
  8. Copy and paste the updated code as shown in tonymacx86-DSDT-FIXES.dsl
STEP 2: EDIT YOUR DSDT WITH YOUR REGISTRY INFORMATION
In this step, you'll examine your registry information and modify the template. You can check your work by comparing to my fully edited GA-P55M-UD2 DSDT with 9400 GT and Core i5 SpeedStep as a guide.
  1. Open /Developer/Applications/IORegistryExplorer
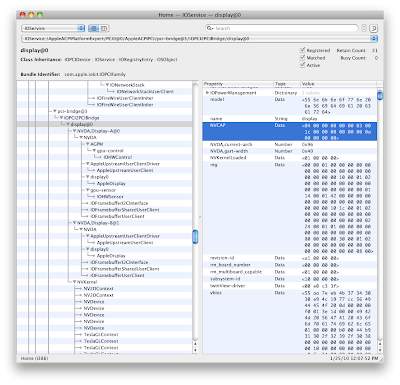
  2. Locate your display data as shown:
  3. Highlight display@0 in the left column.
  4. Locate AAPL,gart-width in right column.
  5. Find the entry for "VRAM,totalsize" in the DSDT graphics code.
  6. Edit your information to match. This entry will be 0x40 for 1GB cards, 0x20 for 512MB cards. 0x10 for 256MB cards If yours doesn't match, make sure you use these values.
  7. Locate NVCAP in right column.
  8. Find the matching entry for "NVCAP" in the DSDT code.
  9. Edit your information to match the NVCAP values.
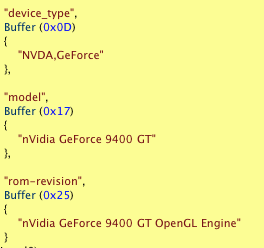
  10. Locate the following section in your DSDT
  11. Customize this text with your specific card's information.
  12. Save your DSDT.aml
  13. When you are finished making changes, click Tools and choose Compile.
  14. If you don't get any errors, click Tools and choose DSDT files folder.
  15. Your DSDT files folder (/Library/Application Support/EvOSoftware/DSDT) will open in Finder. Helpful Hint: you can pull this folder into the sidebar to bookmark it.
  16. Copy your dsdt.aml.
  17. Paste your dsdt.aml into the root / of your hard drive (or /Extra folder for Chameleon RC4).
  18. Capitalize DSDT.aml
STEP 3: REMOVE ALL EXISTING GRAPHICS ENABLERS
You must now remove all Enablers, GraphicsEnabler=Yes, and EFI Strings from your system to test the new injection.
  1. Open /System/Library/Extensions
  2. Delete any Kext Enablers (NVEnabler, NVInject, NVKush, etc…) from your system.
  3. Drag /System/Library/Extensions to Kext Utility
  4. Open /Extra/Extensions/ and open com.apple.boot.plist in TextEdit
  5. Remove any EFI String information and GraphicsEnabler=Yes
STEP 4: REBOOT AND INSPECT PERFORMANCE AND DETECTION
Now is the moment you've been waiting for! To see if it worked.
  1. Reboot your system.
  2. Check your system for QE/CI acceleration.
  3. Open Utilities/System Profiler
  4. You should see the correct information under Graphics as shown below:

Congratulations! You've just hard-coded your graphics information directly into your DSDT! Enjoy your somewhat more 'vanilla' Hackintosh installation!

If QE/CI doesn't work, or you can't change resolutions, check the DSDT code and IORegistryExplorer entries again. You will have to insert your previous method (Enabler/EFI String) back into your system and restart the process. This guide worked on my GA-P55M-UD2 and nVidia 9400 GT, but I haven't tested on any other systems or cards. Other hardware may need different modifications to operate effectively. Post on the forum in the DSDT section if you're having issues.

-tonymacx86

PS: Despite successfully completing this guide, I'm still using NVEnabler64.kext for my system. Unfortunately this method does NOT enable enable TV-OUT (mirroring) on my 9400 GT. I'll update the DSDT code and this page when I find a way. Below is what I see using the NVEnabler64 kext. As I always say, whatever works best! This method may not be relevant to you. Good luck!


For discussions on this and other topics, register today at tonymacx86.com!

Updated ALC 888b DSDT for GA-P55M-UD2


Just a quick post to let GA-P55M-UD2 owners know that I've changed the HDEF section of code in the default tonymacx86-DSDT-FIXES.zip DSDT.aml so that you no longer have to use the old AppleHDA.kext! I've modified the ALC 888b code in the DSDT for the P55M-UD2 so that the LegacyHDA_888b.kext now works with the vanilla 10.6.2 AppleHDA!

You must update to the latest GA-P55M-UD2 bios for this to work! Also, please note that you must enable the proper output in System Preferences/Sound.

I updated all of the files that utilize the UD2 DSDT. Here are some links for all of you UD2 owners. Post your results with this new tweak in the forum here.

Updated tonymacx86-DSDT-FIXES.zip
Includes updated GA-P55M-UD2 DSDT.aml with fixes for CMOS reset, UHCI/EHCI, IDE (SATA), PIC/TMR/HPET, SBUS, and HDEF.
http://www.tonymacx86.com/Public/tonymacx86-DSDT-FIXES.zip

10.6.2 Vanilla AppleHDA.kext
http://www.tonymacx86.com/Public/10.6.2%20AppleHDA.kext.zip


For discussions on this and other topics, register today at tonymacx86.com!

Tweaking Your System: Get Rid of Restart Kexts & New Chameleon RC4 Development

Chameleon 2.0 RC4 open source development has been fast and furious over the past couple of weeks. I've hardly been able to keep track of all of the fixes being developed, but I thought I'd report another leap forward.

With new tweaks to the codebase of the Chameleon 2.0 RC4 bootloader, you can now remove any restart kexts such as OpenHaltRestart.kext or EvOReboot.kext from your /Extra/Extensions folder. The fix was originally developed a few weeks ago by Duvell300 on the Insanelymac forums. You can read more about this development here.

More interestingly, user AsereBLN has wrapped a host of tweaks and code improvements together. He has been working with the Chameleon code as well, incorporating automatic memory recognition in System Profiler, the Platforum UUID fix, Duvell300's RestartFix by default, and more. Other than rolling everything together, one of the coolest new features is that your system will report memory information correctly including manufacturer (Corsair, G.Skill, etc…) to the System Profiler. You must remove all of the Memory information from your smbios.plist for this to work. Check out AsereBLN's original post for the full documentation.


To test out these changes for yourself, download the latest version of AsereBLN's Chameleon 2.0 RC4, and simply replace the boot file at the root of your OS X partition or EFI partition. NOTE: The download includes a few versions of the boot file- the default boot has no Chameleon GUI. Make sure to rename the file boot. Then remove any restart kexts from your /Extra/Extensions folder (don't forget to rebuild caches). If you are unsure of what to remove in your smbios.plist, you can replace yours with my edited iMac 11,1 smbios.plist. You shouldn't have to add anything to your com.apple.boot.plist other than the device-id change referenced in Tweaking Your System: Get Rid of Platform UUID. Also, please note that you will need to move your DSDT.aml to the /Extra folder instead of the root. Or you can specify DSDT='path to your DSDT.aml' in com.apple.boot.plist.

Once again, I'm happy to report anything that will improve your Hackintosh. Special thanks to tonyd for referencing AsereBLN's thread! I'll try to keep this post updated with the latest changes. Have fun!


For discussions on this and other topics, register today at tonymacx86.com!

tonymacx86 Forum!


Over the past 2 months, I've been trying my best to support all of your efforts with installing OS X on your new P55 PCs. I'm happy for your input, but I've been a bit overwhelmed with the questions! My blog comments have become a bit hard to follow, and to that end, I've set up a new forum! I'm pretty sure that this format will work better for supporting the community.

tonymacx86 Forum is a full featured phpBB forum where you can share your experiences and methods installing and tweaking your Hackintoshes. For now, I've set up a very simple topic list, to support the guides on this site. But in no way will the forum be limited to P55 chipsets. There are many new boards and CPUs coming out this year, including the new laptop Core i3/i5 and desktop Core i9 processors! And I'm planning on setting up a forum for older mobos and processors as well.

Here's to a great start! Please stop by to register and say hello!

-tonymacx86

PS: I'm looking for a few experienced leaders for the forums to help me keep it a good resource for anyone's questions and answers. I may some need help moderating the site. Thanks in advance!

Tweaking Your System: Install Chameleon, DSDT, & Extras to EFI Partition

You may or may not be aware of it, but you have a 200 megabyte partition on the root of your drive. It's the OS X EFI partition, which normally holds information specific to Apple Hardware such as bios, etc… For Hackintosh users, however, it has no use whatsoever. It can therefore be re-purposed to hold Chameleon, and any extra files such as DSDT, /Extra/Extensions folder, com.apple.boot.plist, and smbios.plist.

If you're one of those users who like an extremely 'vanilla' installation of OS X, you may want to rid your drive of all extra Hackintosh-related files. The following method will lead you through installing all of these files to your EFI partition.

NOTE: This is entirely optional, and will not give you any benefits beyond cleaning the root of your install. Also, each time you want to make changes, you'll have to mount your EFI partition through the Terminal. If you're uncomfortable using the Terminal, do not proceed.

STEP 1: BEFORE YOU BEGIN
Please be aware that you'll be deleting your bootloader, rendering your drive unbootable without the new EFI partition. Make sure to back up your data, and if possible create an emergency Boot CD or USB drive. If you used the Boot CD method, you can always boot using the tonymacx86-P55BootCD.iso. Alternately, you can create a custom bootable Chameleon USB Drive.

For the purposes of this guide, I recommend unplugging all drives except your Snow Leopard installation hard drive and rebooting. This will minimize any problems with disk number and partition number. I will use disk0 by default in this guide. To make sure your disk is identified as disk0:
  1. Open /Utilities/Terminal
  2. Type diskutil list
  3. Compare your results with the following picture. If yours looks similar, and your root is disk0, you're ready to begin.


STEP 2: REFORMAT AND MOUNT YOUR EFI PARTITION
  1. Open Applications/Utilities/Terminal
  2. Type: sudo -s
  3. Type: newfs_hfs -v EFI /dev/disk0s1
  4. Type: mkdir /Volumes/EFI
  5. Type: mount_hfs /dev/disk0s1 /Volumes/EFI
Your EFI partition should mount on the desktop and in Finder.


STEP 3: INSTALL CHAMELEON TO EFI PARTITION
Because Chameleon will not be on your Snow Leopard partition anymore, you must re-install it to the EFI partition.
  1. Download any Chameleon binary source (For this example: Chameleon-2.0-RC4-r684-bin).
  2. Unzip the folder and place it on the desktop as shown in the picture.
  3. Open Applications/Utilities/Terminal
  4. Type: diskutil list
  5. Locate your EFI partition. It will be under IDENTIFIER. Be sure to use the correct one. (For this example: disk0s1)
  6. Type: cd
  7. Click and drag the Chameleon folder to Terminal, creating a path to it. This is a cool trick that you can use instead of typing the whole path. The command will become: cd /Users/****/Desktop/Chameleon-2.0-RC4-r684-bin
  8. Type: cd /i386
  9. Type: sudo fdisk -f boot0 -u -y /dev/rdisk0
  10. Type: sudo dd if=boot1h of=/dev/rdisk0s1
  11. Type: sudo cp boot /Volumes/EFI/
STEP 4: COPY FILES TO EFI PARTITION AND EDIT COM.APPLE.BOOT.PLIST
In order for your DSDT to be recognized, you must add a line to your com.apple.boot.plist in order for Chameleon to locate it on the EFI partition.
  1. Open /Extra/com.apple.Boot.plist in TextEdit or Property List Editor.
  2. Add the DSDT=hd(0,1)/DSDT.aml flag to your as seen in the pictures below.
  3. Save com.apple.boot.plist
  4. Download and run ShowAllFiles.
  5. Click and drag your DSDT.aml and /Extra folder from Snow Leopard to EFI.
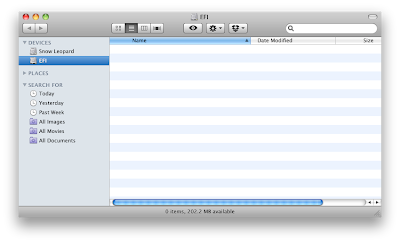
  6. Make sure EFI looks similar to the one in the pictures below.
  7. Delete DSDT.aml, boot, and /Extra folder from Snow Leopard .

STEP 5: SET THE EFI PARTITION AS ACTIVE
You now have to set the EFI partition so that your computer boots from it first.
  1. Open Applications/Utilities/Terminal
  2. Type sudo -s
  3. Enter your password.
  4. Type fdisk -e /dev/rdisk0
  5. Type p
  6. Type f 1
  7. Type w
  8. Type y
  9. Close and re-open Terminal
  10. Type: sudo -s
  11. Enter your password.
  12. Type: umount -f /Volumes/EFI
  13. Type: rm -rf /Volumes/EFI
  14. Type: fsck_hfs /dev/disk0s1
  15. Close Terminal and reboot.
You're done! Special thanks to Munky for the original EFI Partition guides, and the entire OSx86 community, without whom this guide wouldn't exist. Good luck, and let me know if it worked for you!

-tonymacx86

PS: The EFI partition will not automatically mount as other partitions do at boot time. If you ever need to change/update files in your new EFI...
  1. Open Applications/Utilities/Terminal
  2. Type mkdir /Volumes/EFI
  3. Type sudo mount_hfs /dev/disk0s1 /Volumes/EFI
Your EFI Partition will mount on the desktop and in Finder. Copy and paste these commands to a text file for easy access in the future.

EDIT: You can also use this script - EFI Mounter. Special thanks to SirReal for posting this- it's a nice little App you can stick in your Applications folder to mount/unmount your EFI partition.

For discussions on this and other topics, register today at tonymacx86.com!