NOTE: This guide is not current anymore: iBoot + MultiBeast is the recommended method for installation.
The following is not meant to be a definitive method for installing OS X on PC hardware. There are many methods, but this one allows you to install OS X on your P55 computer build using the Snow Leopard retail DVD. Also, it works every time, unlike other methods I have tried. I tailored the install method specifically for my computer, a Gigabyte P55M-UD2 motherboard with an Intel Core i5 750 processor, 4gb of G.Skill Ripjaws 1600 RAM and a Sparkle nVidia GeForce 9400 GT 1GB graphics card. Most likely the method will work for any P55 build, but you’ll have to modify which kexts you use for graphics, etc…
At the end of this guide, you will have a fully stable and functional P55 Hackintosh running OS X Snow Leopard 10.6.2 running the 64-bit Vanilla Kernel. All included kexts are 64-bit ready. The only thing that will not be enabled by default is system sleep.
To enable sleep after your install, follow this guide:
Advanced DSDT Fixes: Enable Sleep on P55 Motherboards
NOTE: This guide assumes you have access to a working OS X install- the fastest and easiest way to get the job done.
What you need:
- A Mac or Working Hackintosh running OS X Leopard or Snow Leopard
- If using a Mac an external hard drive enclosure or adapter
- A Snow Leopard Mac OS X Install DVD
- A USB stick 8gb or larger, or a USB hard drive
- Patience and humility- it may not work out perfectly the first time, but you will learn from your mistakes, and with enough tenacity the promised land can be reached.
STEP 1: PREPARING THE USB DRIVE
In this step, we must prepare a USB Drive to act as an installer for OS X. You may have installed an operating system before using a DVD. This is similar to installing using a DVD, but instead of the computer starting up and booting the DVD, it will start up and boot directly into an external USB drive with your modified OS X Installer DVD copied onto it.
- Boot into your existing OS X Installation.
- Insert your USB drive that you intend to use for booting the installer.
- Open Applications/Utilities/Disk Utility.
- Highlight your USB drive in the left column.
- Click the Partition Tab.
- Click Volume Scheme- choose 1 Partition.
- Click Options…
- Select GUID Partition Table. Click OK.
- In the Name: field type: InstallDrive
- In Format: field select Mac OS Extended (Case Sensitive, Journaled)
- Click Apply, then click Partition.
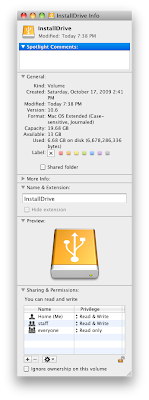
- Right click on InstallDrive in Finder or Desktop. Choose Get Info.
- In the lower right corner, click the lock icon open, type your password and un-check Ignore Ownership on this Volume checkbox. Click the lock icon closed.
- Insert Mac OS X Install DVD or mount Mac OS X Install DVD.dmg
- Switch back to Disk Utility.
- Highlight InstallDrive in the left column.
- Click Restore.
- Right click on Mac OS X Install DVD and choose Set as Source.
- Right click on InstallDrive and choose Set as Destination.
- Un-check Erase Destination checkbox.
- Click Restore, click Restore again, and then type your password.
The DVD will now copy onto your USB drive. It should take less than 10 minutes to complete depending on hard drive speed, DVD speed, etc...

STEP 2: INSTALL CHAMELEON BOOTLOADER TO USB DRIVE
Chameleon is a bootloader. It is open-source software that you load onto your hard drive that loads first and enables your computer to recognize and boot into an OS X Startup Disk or USB Installer. Think of it as a middle ground between your BIOS and your Operating System. In this step you will install Chameleon to your USB Installer drive.
- Download tonymacx86-snowleopard.zip.
- Open and place tonymacx86-snowleopard folder on the desktop.
- Open Apps folder
- Open PC EFI 10.1
- Select InstallDrive and click Continue.
- Click Install, and then type your password.
STEP 3: COPY NECESSARY FILES TO USB INSTALLER DRIVE
In this step, you will copy the boot file, DSDT.aml, and Extra folder from tonymacx86-snowleopard to Snow Leopard. You will also delete the 10.6.0 (10.0.0) Vanilla kernel and drop in the 10.6.0 (10.0.0) Qoopz Voodoo kernel. This is necessary because in OS X Snow Leopard 10.6.0-10.6.1, P55 based systems are not supported- the Qoopz kernel allows P55 support. The boot file is a modified version of Chameleon 2.0 RC3 (PC EFI v10.5!) which includes support for P55 motherboards and i5/i7 1156 processors. If you don’t install this file, the system clock will run too fast causing system-wide problems. The DSDT.aml is a modified version of the instructions that the computer sends to the Operating System which helps the OS recognize devices properly. The one included has fixes for CMOS reset, USB, and HD Audio.
The Extra folder contains com.apple.boot.plist, Extensions Folder, Extensions.mkext, and smbios.plist. apple.com.boot plist is a file which allows you to give Chameleon commands, select alternate kernels, give the system boot commands, etc… The smbios.plist contains information that identifies your computer to OS X. The Extensions Folder contains kexts (kernel extensions) that by default reside in System/Library/Extensions. Extensions.mkext is a cache of all of the kexts in your Extensions folder. At boot, the system loads the cache files located in /Extra/Extensions and /System/Library/Extensions. (/Extra/Extensions.mkext and /System/Library/Extensions.mkext) respectively.
- Open Applications/Utilities/Terminal
- Type: sudo rm /Volumes/InstallDrive/mach_kernel and type your password. (this deletes the stock Kernel)
- Type: sudo rm /Volumes/InstallDrive/boot and type your password. (this deletes the boot file installed from PC EFI 10.1)
- Close Terminal.
- Set up Windows as shown in the photo below.
- Click and drag boot, DSDT.aml, and Extra from tonymacx86-snowleopard to InstallDrive. (boot will become invisible when moved to Snow Leopard)
- Open Qoopz Voodoo kernel for 10.6.0 & 10.6.1 folder.
- Drag mach_kernel to InstallDrive.
STEP 4: PREPARE SNOW LEOPARD HARD DRIVE
Now you need to format your destination hard drive (Snow Leopard) to accept the installation by your InstallDrive. I strongly recommend using a SATA drive.
- Open Applications/Utilities/Disk Utility.
- Highlight the hard drive you want to use as the destination for your actual Snow Leopard Install in the left column.
- Click the Partition Tab.
- Click Volume Scheme- choose 1 Partition.
- Click Options…
- Select GUID Partition Table. Click OK.
- In the Name: field type: Snow Leopard
- In Format: field select Mac OS Extended (Journaled).
- Click Apply, then click Partition.
- Close Disk Utility.
- Right click on Snow Leopard in Finder or Desktop. Choose Get Info.
- In the lower right corner, click the lock icon open, type your password and un-check Ignore Ownership on this Volume checkbox. Click the lock icon closed.
- Shut down computer.
- Remove all hard drives except InstallDrive and Snow Leopard.
STEP 5: CHANGE BIOS SETTINGS
In order for your computer to boot directly into the external USB OS X Installer that we just created, you must change your BIOS settings in CMOS Setup Utility. The BIOS is set up by default to load any SATA or IDE drives before USB drives. Now is a good time to load the Optimized Defaults in the BIOS if you haven’t already, and then make the necessary changes as shown in the pictures.
- Turn on computer, and tap Delete key repeatedly- wait a few seconds for the computer to load CMOS Setup Utility.
- Click Load Optimized Defaults and accept.
- Click Advanced BIOS Features.
- Click Hard Drive Priority.
- Move USB Drive to top of list by highlighting it and hitting PAGE UP.
- Press Escape to get back to Menu.
- Match your settings to the pictures below.
- Click Save & Exit Setup and accept.


 STEP 6: BOOT FROM USB DRIVE AND INSTALL OS X
Upon this restart, the USB Installer will boot using Chameleon boot loader. You should see the PC EFI v10.5 logo, the InstallerDrive and a blue countdown ribbon. It will boot on it’s own- you don’t need to do anything. The com.apple.boot.plist in /Extra contains the kernel flag –v which allows you to watch as the system loads the files that run OS X. If you want to view an apple logo with a spinning wheel, you can remove it later. It is easier to see what’s wrong if you watch the boot sequence.
- Follow the steps of the OS X Installer to install OS X to Snow Leopard.
- After the installation is finished, don’t restart. Turn the power button off without shutting down.
- Remove USB InstallDrive and turn on computer.
STEP 6.5: ALTERNATE METHOD (OPTIONAL)
If you used a Mac laptop & external enclosure to prepare the InstallDrive, and do not have an existing OS X install on your P55 machine, you may find the following alternate method easier. Instead of booting into an existing install to copy the mach_kernel, you can use the OS X Installer's Terminal to copy the kernel to Snow Leopard.
- Boot back into InstallDrive with Snow Leopard attached.
- Go to Utilities/Terminal
- Type: rm /Volumes/Snow\ Leopard/mach_kernel
- Type: cp /mach_kernel /Volumes/Snow\ Leopard/
- Reboot
- Boot back into InstallDrive, then pause Chameleon countdown and select Snow Leopard
- Proceed to STEP 9, then install Chameleon, /Extra, boot, & DSDT.aml following STEP 7 & 8 and the rest of the guide directly from Snow Leopard installation.
STEP 7: INSTALL CHAMELEON TO SNOW LEOPARD DRIVE
After installing, the computer will restart. Boot into your working install to replace files and install Chameleon to your Snow Leopard hard drive. This is the exact thing you did to the USB Installer drive earlier. In this step you will install Chameleon to your Snow Leopard hard drive.
- Boot back into your existing OS X Installation.
- Open Apps folder
- Open PC EFI 10.1
- Click Continue, then Change Install Location…
- Select Snow Leopard and click Continue.
- Click Install, and then type your password.
STEP 8: COPY NECESSARY FILES TO SNOW LEOPARD DRIVE
In this step, you will copy the boot file, DSDT.aml, and Extra folder from tonymacx86-snowleopard to Snow Leopard. You will also delete the 10.6.0 (10.0.0) Vanilla kernel and drop in the 10.6.0 (10.0.0) Qoopz kernel.
- Open Applications/Utilities/Terminal
- Type: sudo rm /Volumes/Snow Leopard/mach_kernel and type your password. (this deletes the stock Kernel)
- Close Terminal.
- Set up Windows as shown in the photo.
- In Snow Leopard, drag Extra to trash. Type your password.
- Click and drag boot, DSDT.aml, and Extra from tonymacx86-snowleopard to Snow Leopard.
- Open Qoopz Voodoo kernel for 10.6.0 & 10.6.1 folder
- Drag mach_kernel to Snow Leopard
STEP 9: FIRST BOOT
The first boot of your new Snow Leopard install will show you a video and then lead you through a standard OS X setup routine for a new Mac.
- Complete the OS X setup routine.
- When you finally get to the desktop, restart the computer. This helps set initial boot caches.
STEP 10: INSTALL ADDITIONAL KEXTS TO SYSTEM/LIBRARY/EXTENSIONS
There are a few kexts that you can’t use in /Extra/Extensions. These include Ethernet kexts. Also, you’ll need to create new cache files any time you remove or replace kexts. There are a few invaluable programs to allow you to do these tasks effortlessly. They are Kext Utility and Kext Helper b7. You can do all of the things in Terminal, but these apps make it easy and foolproof.
Open tonymacx86-snowleopard Apps folder.
- Drag Kext Utility and Kext Helper b7 to your Applications folder.
- Open Kext Helper b7.
- Drag RealtekR1000SL.kext (or Intel82566MM.kext if you have an Intel Motherboard) from System – Library – Extensions into Kext Helper b7.
- Type your password and click EASY INSTALL.
- Close Kext Helper b7.
- Open Snow Leopard drive.
- Drag /Extra/Extensions folder onto Kext Utility application. (This will repair permissions on the folder, backup your cache file, and replace cache file with an updated one.)
- Drag /System/Library/Extensions folder onto Kext Utility application.
- Open Applications/Utilities/Disk Utility
- Highlight Snow Leopard in the left column.
- Click Repair Permissions.
- Restart computer.
STEP 11: UPDATE TO 10.6.2
Upon the release of Mac OS X Snow Leopard 10.6.2, and the 27" Intel Core i5 and i7 iMacs, OS X Snow Leopard supports P55 based systems. This means that you can update without worrying about putting the Qoopz kernel back in. The update will install the 10.2.0 Vanilla Kernel, as well as a host of security and stability fixes. Details are available on Apple’s website.
- Download the Mac OS X 10.6.2 Combo Update here:
http://www.apple.com/downloads/macosx/apple/macosx_updates/macosxv1062updatecombo.html
- Drag your /System/Library/Extensions folder to the desktop. You may need some of the 10.6.0 Extensions later. It’s always good to have a backup before any ‘point’ system update.
- Right click and rename the folder 10.6.0 Extensions.
- Mount MacOSXUpdCombo10.6.2.dmg
- Install MacOSXUpdCombo10.6.2.pkg
OPTIONAL INSTALLS:
The following step is optional- you may now be finished!
STEP 12: ENABLE QUARTZ EXTREME AND CORE IMAGE (QE/CI)
This step is necessary only if you don't have the full power of your graphics card already. By default, the com.apple.boot.plist has GraphicsEnabler=Yes selected, and should work for most cards. You can test if you have QE/CI enabled by pressing F12 (Dashboard) and trying to add a widget. If you see ripples, you have QE/CI enabled.
This step allows OS X to fully recognize and enable the power of your graphics card, like a driver. If you have an nVidia graphics card, you can also use NVEnabler 64.kext which is located on the tonymacx86-snowleopard folder in System-Library-Extensions. This kext is known to solve issues with TV-out.
- Open tonymacx86-snowleopard.
- Drag NVEnabler 64.kext from System – Library – Extensions into Kext Helper b7.
- Type your password and click EASY INSTALL.
- Close Kext Helper b7.
- Open Snow Leopard drive.
- Drag /Extra/Extensions folder onto Kext Utility application.
- Drag /System/Library/Extensions folder onto Kext Utility application.
- Open Extra folder
- Drag com.apple.boot.plist to desktop.
- Double click to open in TextEdit
- Remove the GraphicsEnabler=yes line.
- Drag the edited com.apple.boot.plist back to Extra folder.
- Open Applications/Utilities/Disk Utility
- Highlight Snow Leopard in the left column.
- Click Repair Permissions.
- Restart computer.
YOU’RE DONE!
One final note. This is how I got my system working. If I find a way without replacing any old kexts, I’ll certainly let you know. I’m working on enabling sleep for this motherboard, and I will post a method if I come across a solution.
If you’re having issues with any component, most likely graphics if you have an ATI card, know that there are many ways to enable graphics. Most likely there is a solution that can be found. I may be able to help you if you post your issue in the comments to this post. Thanks for reading and I hope it worked for you! Special thanks goes out to the entire OSx86 Hackintosh community! This guide was cobbled together from various sources- I did not invent this method, and do not wish to take any credit beyond putting it into plain English. ;)
-tonymacx86
PS: If you want to enable the Apple Boot Screen on startup, read this post:
http://tonymacx86.blogspot.com/2009/11/enable-apple-boot-screen.html
EDIT #1 (2009-11-17): tonymacx86-snowleopard.zip now contains a modified version of PC EFI v10.5 for P55 Boards! This means ATI users can now use GraphicsEnabler=Yes flag in com.apple.boot.plist. I updated the com.apple.boot.plist to include this flag by default. Therefore, you may not have to use NVEnabler 64.kext anymore either. I made a few changes to the guide accordingly. Unfortunately I don't have an ATI card to test. I believe both nVidia and ATI cards will now be fully enabled by default by using this guide. For further ATI solutions, check out
this post on netkas' blog.
EDIT #2 (2009-12-07): If you're having trouble booting, it may be the 10.6.0 Qoopz kernel. Replace each reference of the Qoopz kernel in the above guide with the
Vanilla 10.6.2 kernel. Also, I added an optional
STEP 6.5 specifically for users who do not have an existing Hackintosh install on their P55. After installation, instead of booting into an existing install to copy the mach_kernel, you can use the OS X Installer's Terminal to copy the kernel to Snow Leopard.
EDIT #3 (2010-01-23): Removed the following section due to new edits of the GA-P55M-UD2 DSDT. The updated version is now included by default in tonymacx86-snowleopard.zip.
STEP 12: REPLACE FILES AND REBOOT
This step is necessary if using the LegacyHDA_ALC888B.kext in the Extra folder for audio. You must replace the 10.6.2 AppleHDA.kext with the one from 10.6.1. Because this guide skipped 10.6.1, I included it in tonymacx86-snowleopard. You may use something else such as VoodooHDA.kext, and you’ll never have to replace anything, but I prefer this one as it maps the ins and outs directly for the UD2 motherboard. **Most likely the kext will be updated and this step will become unnecessary. (2010-01-23)
- Open tonymacx86-snowleopard.
- Drag AppleHDA.kext from System – Library – Extensions into Kext Helper b7.
- Type your password and click EASY INSTALL.
- Close Kext Helper b7.
- Open Snow Leopard drive.
- Drag /Extra/Extensions folder onto Kext Utility application.
- Drag /System/Library/Extensions folder onto Kext Utility application.
- Open Applications/Utilities/Disk Utility
- Highlight Snow Leopard in the left column.
- Click Repair Permissions.
- Restart computer.

For discussions on this and other topics, register today at tonymacx86.com!


